Add Extra Fans to Your Mac
Eric Buczynski June 18, 2007 Tutorials Mac Hardware
Summer’s finally here! Soon we’ll hear kids laughing and playing in pools, smell burgers and ‘dogs on the grill, feel pimped-out 4-door sedans blasting rap songs, and listen to people complaining about how their new air conditioner conked out on the hottest day of the year.
Don’t let that happen to your Mac. Whether you’re running several CPU-intensive applications at the same time, or you’re in the heat of battle playing multiplayer games, you don’t want your Mac to conk out during the latest DVD-rip or frag-fest this summer. Unless you’ve overclocked your processor or done similar modifications (“mods”), it’s highly unlikely that your Mac will shut down from heat buildup alone. This article will show you a couple ways to keep your Mac running a little cooler than usual.
Cooling Modification Basics
Cooling involves modifying your Mac, and there are already plenty of websites out there that cover Mac modification, such as Applefritter (http://www.applefritter.com/main), Mod Your Mac (http://www.modyourmac.com/), and our personal favorite, MacMod.com (http://www.macmod.com/). These websites cover everything from minor case modification to hard core tricks that involve installing third-party internal power supplies. These extreme mods may inspire you to go further.
To keep things simple, we’ll focus on adding extra fans to your Mac. The Mac that we’ll be using is our own G4 Digital Audio. This is an ongoing process, so even though we have one extra fan installed, many more can be added over time.
You need to do some careful planning before you start adding extra fans to your Mac:
- Make sure that the fans will be placed logically. You don’t want to have two fans that are on opposite ends of the hot item, because the hot air will be pulled in opposite directions. The airflow in a Mac has already been engineered, so unless you’re going to cut out part of the metal chassis with a hacksaw and add extra ventilation, try not to disrupt the initial airflow.
- Be sure that each fan will have power. When you buy a fan, it comes with either a two- or three-pin connector. We’ve been having a hard time finding the individual pins and the types of connectors soldered to the motherboard. Because of this, we’ve had to use our soldering skills to supply power to some of the fans. They get juice from the hard drive power connectors that come from the power supply. Those wires are a smaller gauge of wire which means they are thicker than the wires coming from the fans. You can use a combination of crimpers and a power connector splitter to join the two, but we don’t know how effective or safe this is.
- Is it ever possible to over-engineer something? Maybe with some things, but not with adding fans. You just have to make sure that everything works before you start installing it. We can open our Mac’s case and see places where extra fans would definitely come in handy. But we can only see what it looks like when it’s opened. To get around this, we removed the DVD drive chassis, closed the case, and put in a penlight. Also, repeatedly opening and closing the case slowly helped to determine where fans could and could not be installed. We would have liked to install a fan underneath the power supply, but the AGP card gets in the way.
To make things a little easier, we’ll show you what fans we have installed, as well as show you how to build a circuit board that will act as a power hub for your fans. If you’re good at soldering, then the following steps should be easy to follow. If not, there are alternatives to soldering, but it still involves stripping a few wires and crimping them to a power source.
Preview of the Final Project
What you’ll end up having is a circuit board mounted to a free hard drive plate. The circuit board will have PC board terminals soldered to it with the wires soldered to those on the underside of the circuit board. Ours looks like this:
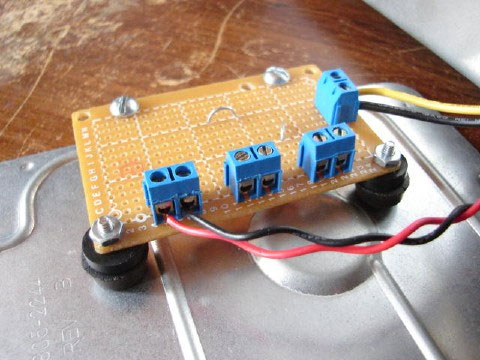
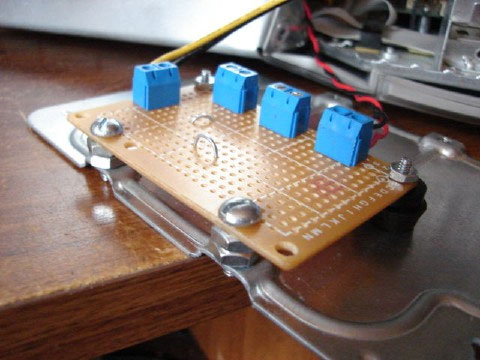
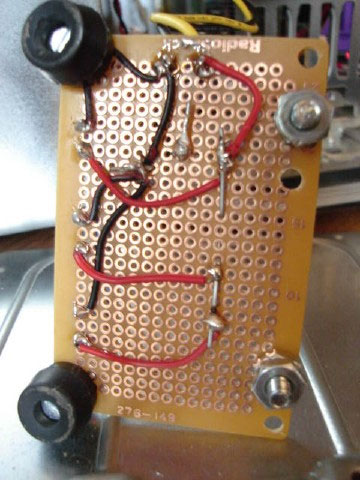
You’ll have power coming from a hard drive power connector that heads to connectors in parallel. Since we didn’t want to drill through our hard drive plate, we affixed some rubber feet that came from an unused SCSI enclosure on our circuit board.
We had to use a bigger drill bit to widen the pre-existing mounting holes on the circuit board, but it is still very stable. When we want to hook up a fan, we remove the connector from the fan - leaving just wires - prep the wires and put them into the terminals. We’ll talk about this later.
What Parts Do You Need?
Even if you don’t install every type of fan listed here, you’ll need some parts to get the job done. If you’ve never soldered before, now is a good time to learn. You’ll find that once you get the hang of it, you might be able to repair certain wires. If you’re like us, you’ll also find out the hard way when to slow down and concentrate, but not after grabbing the end of a hot soldering iron with your fingers.
Solder (pronounced “SOT-ter”) and wires are pretty cheap, along with most of the other little things such as wire terminals, male and female wire connectors, and butts.
Here are some basic parts you’ll need:
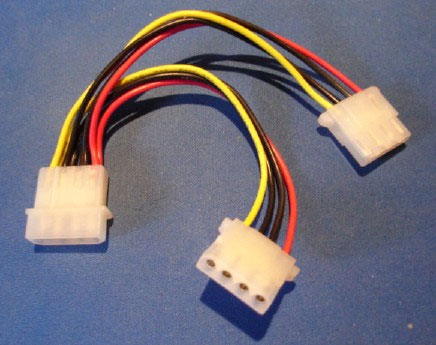
Power Connector Splitter
Whether you’re soldering, crimping or both, you’ll need to get a power connector splitter. These can be had for a buck or two at any computer store. You simply take one of the power connectors that comes from the hard drive and plug it into the open end with pins. Normally, it’s used to power two hard drives from one cable, but we’re only going to be cutting up one side of the extensions. The black wires are for grounding, while the yellow wire is for +12 volt items and the red wire is for +5 volt items. The only types of computer fans I’ve seen are +12 volt. You can use the +5 volt wire on +12 volt fans, but the fans won’t run to their full capacity.
Small Parts
You’ll need some of these around too. In the front row (left to right) are butts, male and female connectors, male and female connectors joined, and jacketed (shielded) male and female connectors. The butts are used to join two wire tips together to make one wire. The female and male connectors can be connected to wires for items that may be connected elsewhere or might be replaced periodically. This means you won’t have to strip existing wires repeatedly. The shielded connectors are best used when there is a chance of the connectors touching exposed metal.
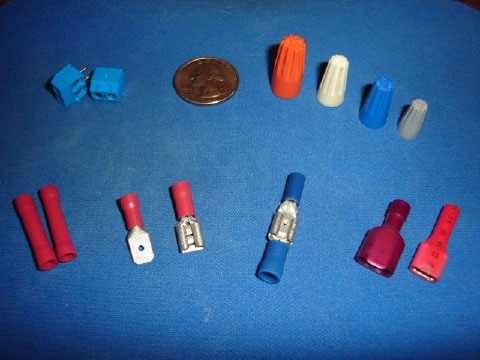
You’ll notice that the terminals are color coded. The ones in red will accept 22 to 18 gauge wire, the blue ones take 16 to 14 gauge wire, and the yellow ones will take 12 to 10 gauge wire. You’ll notice the same color codes on the wire stripper as well. A blue male connector will fit inside of a red female connector. However, it’s better to keep the wire gauges consistent with each other.
The top row consists of PC board terminals, a quarter for size reference, and different sizes of caps. The PC board terminals are described below. The caps are used to join multiple wires together or “cap” a loose end. To do, this you simply take the strands of each wire, line the wires so that they’re aiming in the same direction, then braid the fine wires into one. Finally, you take the cap and twist it in the same direction the combined wires are twisted until you feel resistance when twisting it on. The caps are colored by size, so the larger wires require larger caps.
PC Board Terminals
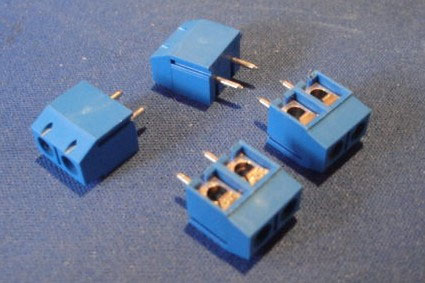
These little doo-dads are pretty nifty. We picked up pack of four at the local Radio Shack for around $2. With these, you can solder the bottoms into the circuit board, insert the item’s positive and negative wires into the terminal holes, and then secure them down by turning a top-mounted screw. This adds an extra solder step, but it saves you from having to remove the solder and start over again in case you want to replace any faulty wires or replace the fan with a stronger, quieter fan. These are the equivalent to speaker jacks, but instead of simply turning them or letting the plastic tab catch the cord, any inserted wires are secured by turning the screw on top.
Circuit Board
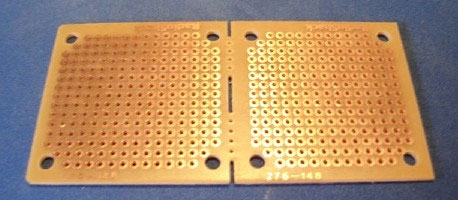
Here’s one small circuit board you can buy from the fine folks at Radio Shack. This board can be split in half, but we recommend keeping it intact so that you can have a longer surface to work with, especially when mounting it to a hard drive plate.
Wire Stripper
This makes stripping and crimping much easier than using tin snips or needle-nose pliers. Simply check the gauge of wire you have, insert the wire into the appropriate hole, clamp down on the wire, then grab near the end and pull. You should wind up with the wire tip exposed.
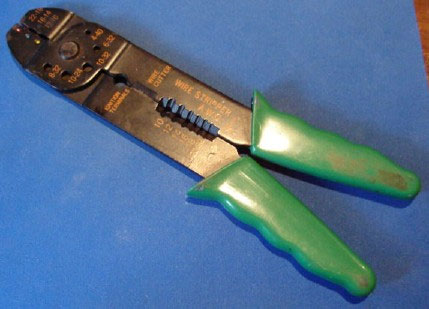
Eventually the strippers wear down, but if you’re careful, you can put the wire in the wire cutter part, and squeeze it at the right tension to leave an exposed end and not cut the tip off. The top part of the stripper is used to crimp the butts and connectors, and here’s how to crimp:
Get the connector and stripped wire.
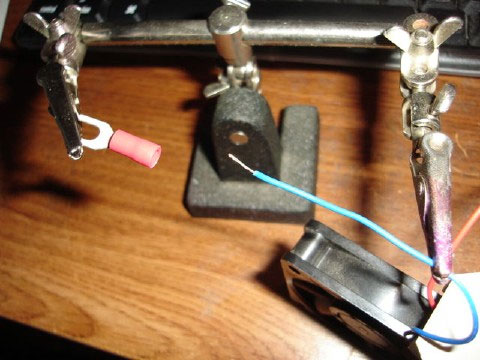
Insert the wire into the open end.
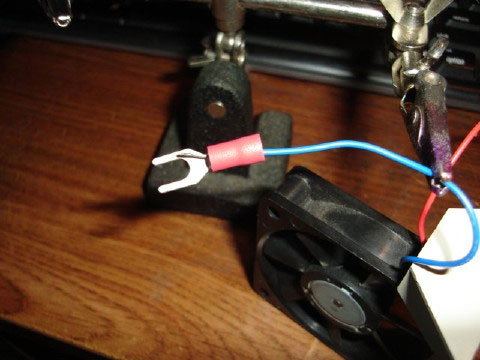
Crimp the wire in the connector.
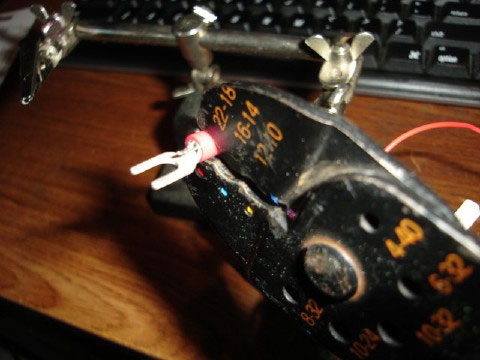
Test the connection by gently tugging on the wire. If it comes out, try inserting it again and crimping down harder. You can also solder the wire tip to the connector itself if you want a stronger connection. Wire strippers can be had for between $5-$10, although we’ve seen a few different kinds at the “Everything’s $1” stores.
Soldering Iron
If you’re permanently connecting more than one fan and you don’t already own a soldering iron, it’s best that you purchase one. These can be purchased for $15-$20. It plugs into an electric outlet, and you’ll need some sort of stand to put it on so that it doesn’t burn or mar the surface you’re working on. We use an old hard drive plate with risers. Be sure to get a pair of safety goggles if you don’t already own a pair or wear glasses. You’ll be happy to know that the soldering iron utilizes another great piece of free gear: a wet sponge or wet paper towel. That’s used to cool it periodically during usage and immediately after it’s been unplugged.
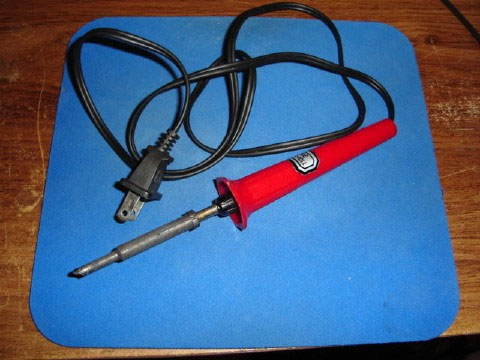
Try to avoid purchasing the soldering iron that’s been advertised on TV as being cool to the touch. Although it does work, the immediate cooling and heating of the tip shortens its life. Don’t forget the soldering wire also. Since you’ll be working with smaller parts, try to get a thinner wire for soldering.
Fans
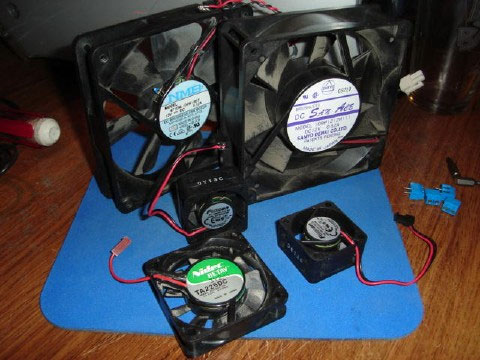
What good would this project be without fans? This photo shows some of the fans available. The top two are main fans, and you’ll see that one is thicker than the other. With some wiring skills, you can remove the existing G4 fan and put the thicker fan in its place.
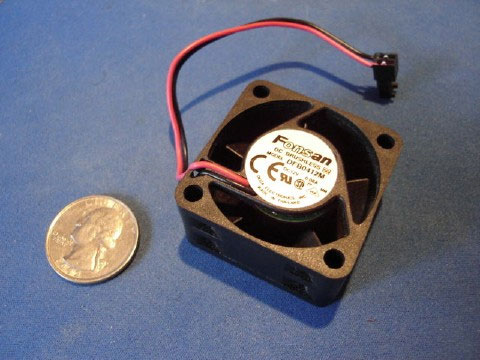
The smaller fans measure 40mm x 40mm x 20mm, but they fit in the tightest of areas. Here is one of the fans shown next to a quarter for scale comparison. Be aware that those selling fans on eBay usually list them in millimeters (mm) and not inches, but you can see for yourself if search for “computer fan.” Try the same search on Wikipedia for a description of various fan types out there.
Lastly, you’ll need some nuts and bolts. These will be used to affix the fans to certain parts inside the Mac, in addition to bolting the circuit board to the hard drive plate. You’ll also need two paper clips - they’ll be used as positive and negative “rails” to connect the wire’s connection terminals to the power source.
Getting Started - Prep Work
First, we’ll cover the types of fans you can install. This way, if you choose not to do any soldering, you can get by with crimping power cables instead. Then we’ll wrap it up with directions on how to wire the circuit board so that you can have a power hub for your fans.
Take the power connector splitter. You’ll need to use use a wire stripper or cable cutter and cut off the clear plastic connector from one of the split ends (the plastic connector with the holes, not the plastic connector with the four prongs). Take the yellow wire and black wire next to it, remove about 1/2" of coating from the ends, twist each of the exposed ends, then apply some solder around each one. Now they’re ready to be connected to your circuit board or to another fan.
It’s better to keep the wire gauges consistent with each other. Now you should have a black and red wire remaining. Take two small caps (usually gray in color), and screw one on the black wire and one on the red wire. you’ll know they’re on good when you feel some resistance and the entire wire starts to twist around. Now these ends will be securely capped without accidentally touching any other metal inside the Mac chassis. Our cap job looks like this:
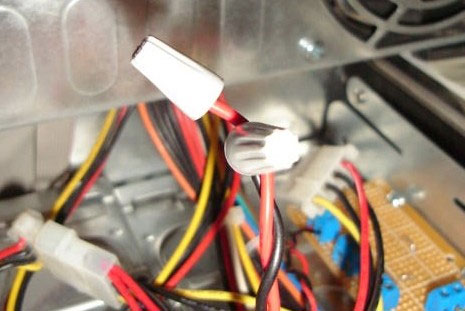
You may notice that we’ve braided the wires so they’re not moving anywhere they shouldn’t be. Just be sure that you now have enough room to work on your Mac while the case is open. Don’t forget to shut down and unplug your machine before you hook up the fans and power connectors.
A Cheap Hard Drive Cooler
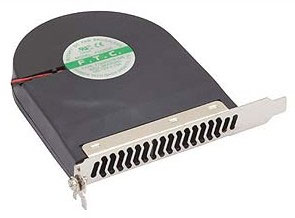
A hard drive cooler is a very easy cooling mod that involves just a few extra parts a little drilling. We purchased a PCI fan that looks similar to this:
The extra parts needed for this modification are:
- PCI Fan
- Screwdriver
- Free space for the fan under the hard drive
The PCI fan was a breeze to install (no pun intended). There were reports of it not working well with G4 models similar to ours. Somehow it interfered with the existing airflow inside the case. We didn’t want to give it up though. We noticed that it had a similar size to the hard drive, so we thought we’d mod it to fit the hard drive.
These things are made pretty cheaply, so they can also come apart with very little force. Unfortunately, our own PCI fan had seen a lot of use, so the wires attached to the motor had come off over time. More often than not, this will not be the case. This photo shows the metal plate detached from the plastic housing. We had already bent one end of it to fit the hard drive bracket.
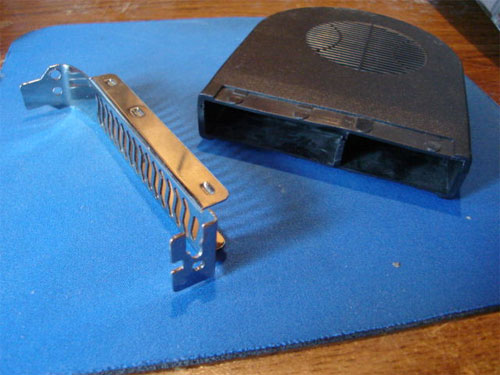
Using a pair of needle-nosed pliers made it easier to bend the metal plate back a bit. The challenging part was attempting to bend it sharply at the correct angle so that we could drill a hole near the bent part without actually having to drill on the bend itself. This would make it easier to insert a securing screw later on. In the above photo, the bent part is on the upper left.
What we did was keep the hard drive mounted against the bottom of the plate (as it should be normally). The PCI fan already has a notch in the metal bracket so it can be secured with a screw. So we attached the notched end to the hard drive bracket, then held the other end in place as we drilled through an existing hole on the bracket. Now when the fan is mounted, it will match up to the existing holes on the hard drive bracket.
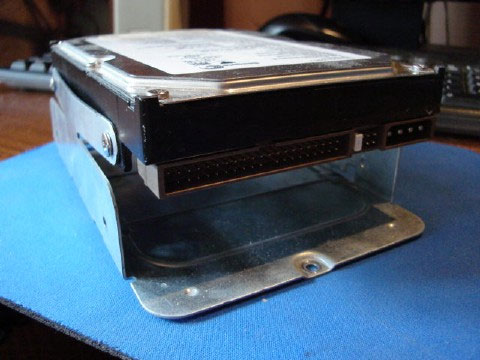
At first we had it mounted correctly, but then we realized that most of the heat generated from the drive came from the bottom. It was then that we decided to mount the hard drive on the upper bracket and mount the PCI fan below it (the above photo shows the hard drive minus the extra fan). We only had to drill one more hole on the fan bracket so that it would fit the drive bracket holes whether it was on top of the drive or below it.
The fan itself came with a pass-through power connector, so we were able to hook it up to the hard drive and hook up the hard drive power (from the Mac’s power supply) to that. This saves you from having to solder it to a power source. We used a utility called Temperature Monitor Lite to read the before and after numbers when using the fan. Adding the fan didn’t result in a drastic decrease in the hard drive temperature, but we’re sure that every little bit helps.
Since you have the basic framework, you can combine multiple fans together using some plate metal and some screws. If you don’t want to run this risk of ruining a fan or diving into electrical work, you can get ready-made hard drive coolers at your local computer store, then simply attach it to an existing hard drive power connector.
The Speaker Fan
Our first real fan modification involved the G4 speaker grille:
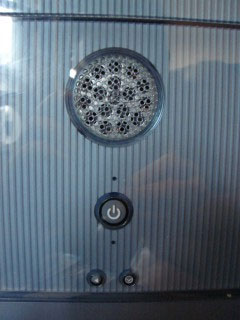
This modification requires these extra parts:
- Allen wrench or T10 star bit with variable bit screwdriver: For removing the front handles from the case.
- Rubber grommets / rubber washers: Dampens vibration and noise between the fan and chassis.
- Drill with drill bits suited for piercing through metal.
We learned a little from the Mac modding sites and decided that we wanted some air to come into the Mac as well as go out of it. A few people had recommended the investment of a Sawzall to cut some of the metal from the Mac case when doing major cooling mods. We didn’t have the money for one of those puppies, and being that we have an external speaker source, we decided to use the front speaker of our Mac as an air inlet.
Performing this modification requires a few more tools and a bit more work than the PCI fan installation. What we’ll do is remove the front panel, place the fan near the front grille, mark where the holes should be drilled for the screws to pass through the fan housing, and then remove the original speaker. With the area cleared and the front panel marked, we’ll drill two holes through the front panel (Gasp! Yes, this requires some drilling through your beloved Mac’s metal chassis), prep the wires on the fan and hook it up to a power source, then mount it on the inside of the Mac.
On the Mac G4 Graphite series of desktops, the front handles need to be removed. The G3 desktops that have a similar look have the same type of screws as well. If you don’t have the type of Allen wrench used to undo these types of screws, you can also use a star-type bit like the following:
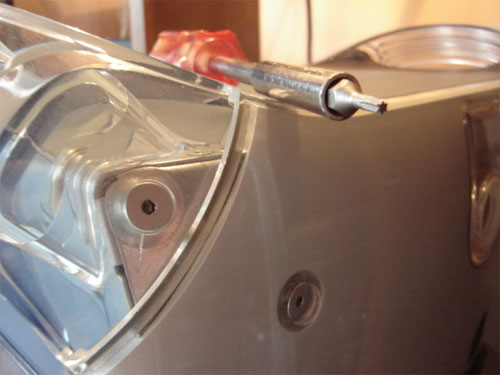
This star-shaped bit works surprisingly well and, in our opinion, has a better grip than the Allen wrench. If, when removed, the screw is stuck to the bit; you can simply insert it back into the case until it stays somewhat, then wiggle the bit out of the screw. So far, this type of drill bit hasn’t stripped easily like the Allen wrenches do.
Remove the panels covering the removable media drive and the space below it. This can be done by opening the case if it is not open already, then gently pushing in the round tabs closer to the front of the case:
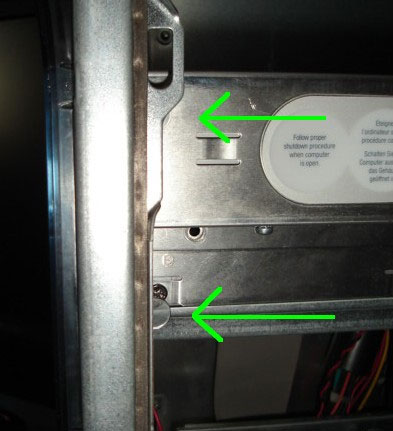
…then swinging the front plate out to the left toward you to remove it:
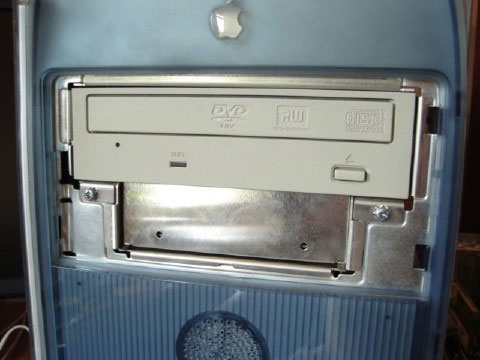
When that’s completed, use a flat-head screwdriver to pry the front panel away from the chassis. The bright green arrows indicate the slots to insert the screwdriver. This photo was taken while the top and bottom handles were still on, but you get the idea:
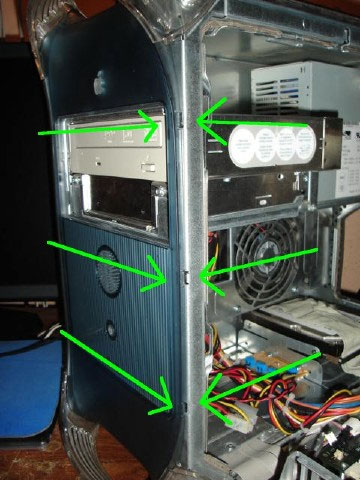
Like the previous photos, once the right side comes loose, swing the panel out to the left toward you and it will unhinge itself from the left side. This front panel removal exposes the power light and the speaker. Now you can move the tabs holding the speaker away from the front panel, which will come out from inside the chassis. The speaker itself is attached to a two-prong connector on the logic board located next to the AirPort slot. Follow the wires coming from the speaker and you’ll see where it leads, then remove the jack from the prongs. You can also remove the cloth circle from the speaker grille. This is where the air will come into the computer.
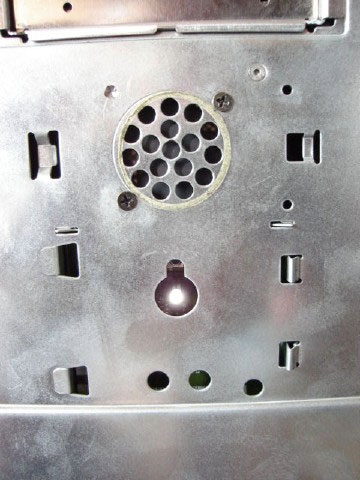
This photo shows our Mac with the fan already installed. You can see the two screws near the speaker grille where they pass through the chassis and into the fan chassis.
Next, you need to take the fan and line up two opposite holes (top-left and bottom-right, or top-right and-bottom left) and place it as close as you can so that the fan blades line up to the speaker grille, and then use a thin pen or marker to mark where the holes will be drilled. Before drilling, make sure the screws will be thick enough to fit through the end holes easily. If they protrude too far into the case, you may have to use a Dremel to chop off the ends. The screws that we use to support our fan do not fit all the way through the fan itself, but they’re thick enough to prevent the fan from moving around.
After the holes have been drilled, insert the screws without the fan on the inside to test the resistance while going into the Mac’s chassis. If you want, you can also install rubber grommets or rubber washers. It may take a bit of lining up to get it right, but you can start to insert one screw, put the washer or grommet on the inside so that the screw touches it, then start to put the fan on. Once you’ve got the screw passing through the grommet or washer and have it inserted halfway into the fan chassis, line up the other hole from the fan chassis and repeat the same process with the other grommet or washer. This will dampen any vibration that the intake fan may cause. Don’t forget to strip the fan wires and coat the tips with solder also. It’s better to do this when the fan is removed.
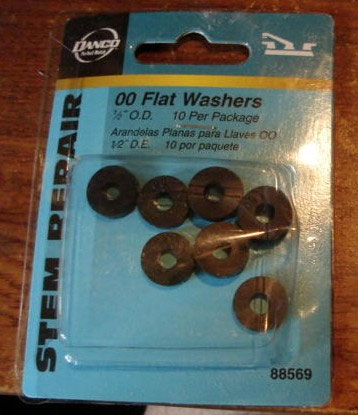
When you’ve got a good fit, secure the fan to the back of the front panel inside of the Mac. If you want the fan to be an intake, make sure the sticker on the fan faces the inside the Mac. But if you want the fan to be an exhaust and take hot air out of the Mac, make sure the fan sticker faces the outside and is obscured by the speaker grille. If you’ve put the grommets or washers between the fan and chassis, this will also lessen some noise and lower the chance of the fan slowing down from being screwed in too tightly from the front.
Originally, we had problems with one small fan where the wires kept coming loose after questionable crimp jobs. So the last thing we did was to crimp male and female terminals to the positive and negative wires from the fan, then do the same to the wires leading to the PC Board terminals. Instead of crimping both male connectors to the positive and negative wires on the fan, we decided to make the positive (red) cable have a female connector and the negative (black) cable have a male connector.
This way, there was no chance of accidentally getting the wire polarity wrong when hooking it up. From there, we put a female connector on the black wire going to the PC board terminal and put a male connector on the positive wire going to the terminal. Then we used a bit of solder on the fan terminals to ensure that they’d stay put. Here’s a closeup:
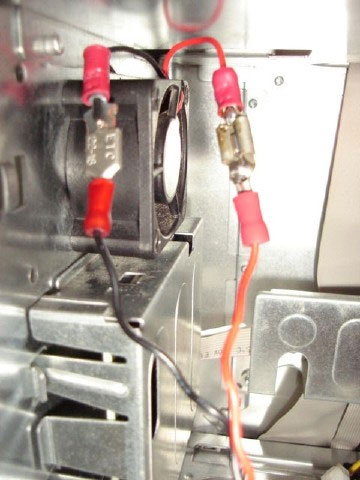
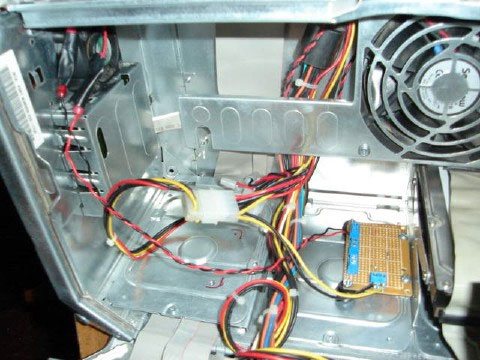
Since it’s dangerous to leave the exposed metal where it could touch the metal chassis, we wrapped both wires separately in electrical tape on the exposed parts. If we had carefully planned it beforehand, we would have used the shielded connectors that we explained earlier in the parts section instead of using bare connectors and taping them later. Once that was completed, we connected the wires to the PC Board terminals that were soldered to our circuit board and powered it up. Now we had a working intake fan! Here’s a shot of the inside:
The Circuit Board
If you’ve made it this far, congratulations. This is probably the most difficult part of the project, because it involves more planning and a bit of engineering. There are several factors you’ll need to think about:
- Where will I put it? Will it be in a place I can reach easily? How difficult will it be to swap cables or fan wires? Will it be out of the way of other components? Will other wires reaching to the power supply be obstructed? How will other fan wires reach the circuit board?
- How will it be mounted? We had ours perched on two long screws that protruded from the hard drive plate. We didn’t think this was a big deal, because the resistance from the screws held it in place. After a while, we realized that if we were to put pressure on the circuit board, it might snap off from the screws holding it in place. That’s when we decided to have it mounted closer to the hard drive plate by using shorter screws. In addition, we used two nuts placed together as a spacer, then used two rubber feet with screw holes in them on the other side to absorb any pressure that we might accidentally put on the circuit board. If anything, it kept it level with the screw mounts, plus it was still raised enough that any metal parts from the soldering work underneath the board wouldn’t make contact with the metal plate.
- Availability: Make sure you have the stuff you’ll need ahead of time. Most of us know what it’s like to get into a project and lose interest when we have to run out to the store for parts.
- Ease of use: Don’t overestimate your abilities. If you have doubts, practice soldering and making connections on loose wires beforehand.
Take a close look at this picture:
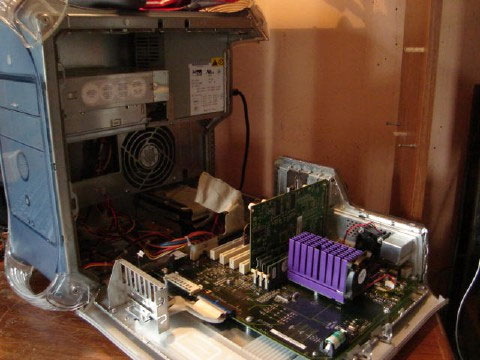
Already you can probably find places to mount extra fans or the circuit board. In fact, we’ve already started by putting a fan through the back holes next the the modem jack to cool off the CPU a bit. By leaving the two leftmost PCI slots free, we can do a bit of metalwork to make a frame and mount two more small fans if we wanted. Oh, the possibilities… But wait:
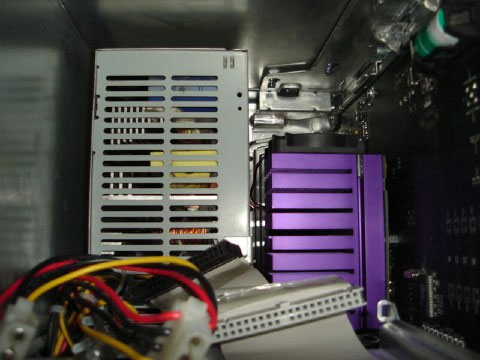
What’s this? It appears to be a shot of the inside of our Mac when it’s closed. That’s right! You’re not going to run it with the side panel open all the time, so you have to test how things will fit beforehand. We covered this at the beginning of the article, but we wanted to remind you one more time.
Subscribe to our email newsletter
Sign up and get Macinstruct's tutorials delivered to your inbox. No spam, promise!