Ten Indispensable iTunes Tips
Matt Cone July 10, 2007 Tutorials Mac Music
A coworker recently told us that “iTunes is a pretty straightforward application.” He’s right, of course - it is pretty straightforward after you get the hang of it. And undoubtedly most people will be satisfied with merely purchasing and playing songs, creating playlists, and burning CDs. For those who want to go a little further, however, we offer these ten indispensable iTunes tips to make your Mac music-listening experience even better!
1. Set the iTunes Equalizer
No two speaker systems are exactly alike, and no two people hear sounds exactly the same way. That’s why iTunes comes with a graphic equalizer! This little window allows you to tweak the sound output settings for optimum sound quality.
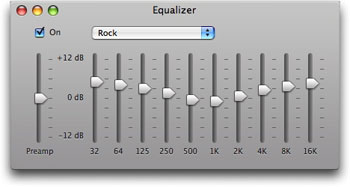
To get to the iTunes equalizer, select Show Equalizer from the View menu. Make sure it’s turned on before you start playing around with the audio levels. You can choose from 22 equalizer presets from the drop-down menu. These presets actually do a pretty good job of matching your favorite type of music and producing great sound!
2. Get Missing Album Artwork
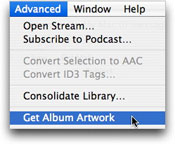
Every song purchased from the iTunes Music Store comes with album artwork. This is handy for things like Front Row, AppleTV, an iPod, and even the iPhone. But what about music you rip from your personal CD collection? Where can you get album artwork for those songs? iTunes allows you to freely download artwork for music you rip onto your Mac, provided it’s sold in the iTunes Music Store. To download album artwork for all of your music, select Get Album Artwork from the Advanced menu. iTunes will go out and fetch all of your missing album artwork. Be patient - this can take a while!
If iTunes can’t find the album artwork, you may have to use a third-party application like Fetch Art or TuneSleeve (Windows only).
3. Use the iTunes Mini Player
We’ll be honest with you: We hate how iTunes takes up our entire screen. Apparently someone at Apple did, too, because you can change iTunes into a really sweet mini player that takes up a fraction of the space!

To turn iTunes into the mini player, click the green plus button in the upper left-hand corner of the iTunes windows.

To get back to the full iTunes window, just click the green plus button again.
4. Deauthorize All iTunes Computers
So, you have an iTunes Music Store account, right? And when you purchase music from iTunes, you’re allowed to play it on five computers. To play your music on other computers, you authorize those computers to play your music by signing in with your iTunes account. But what happens if you forget to deauthorize your friend’s computers and you reach your five computer limit? You can deauthorize every computer you’ve ever authorized by clicking a button in your iTunes account page. Select View My Account from the Store menu. Click the Deauthorize All button.

According to Apple, “You may only use this feature once per year. The Deauthorize All button will not appear if you have fewer than 5 authorized computers or if you have used this option within the last 12 months.”
5. Authorize More Than Five iTunes Computers
Sure, you can purchase iTunes Plus tracks now and use them on as many computers and devices as you like, but the DRM-free songs are only available from certain artists on certain record labels. If you’d like to authorize more than five machines to play your old-school DRM songs from iTunes, you should look into iTude, a free AppleScript that allows you to authorize computers without taking up authorization slots. Obviously, this is not sanctioned by Apple, and it doesn’t work on Windows machines.
6. Control iTunes From the Dock
Multi-tasking with iTunes can be a real drag, especially when you’re skipping around in your music library. Fortunately, there’s a way to control iTunes without actually going into the application itself. Just right click on the iTunes icon and navigate your library!
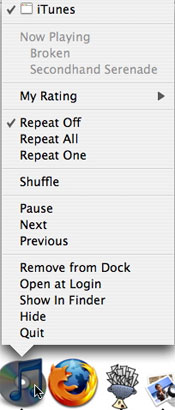
There aren’t a lot of options in this menu, but it’s better than going into iTunes, right?
7. Rate Songs According to Your Moods
iTunes allows you to rate songs with stars, but it’s a time-consuming and thankless task. Plus, rating songs isn’t all that useful unless you use smart playlists or sort your songs by ratings. Moody is a free Mac application that allows you to tag songs by mood.
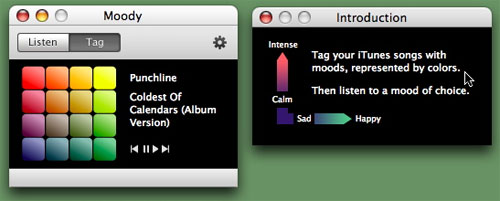
It’s a great concept. Just think: You can start the day at work with aggressive gangsta rap, and then finish the afternoon off with a little calm-mood music.
8. Use iTunes to Fulfill Your DJ Dreams
Much to the dismay of our professional DJ and vinyl-loving friends, iTunes comes with about all of the features you’ll need to be an amateur DJ. To access the options, select Preferences from the iTunes menu. Select the Playback tab.
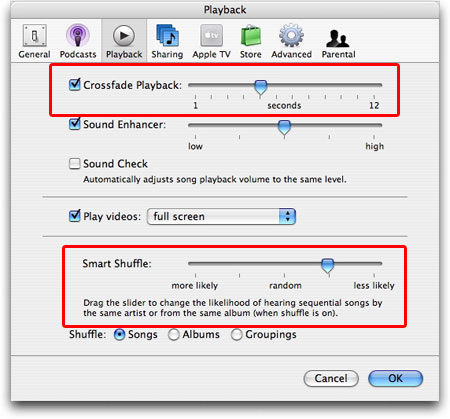
Turn on Crossfade Playback for that professional radio-like fade effect. (You might have to play around with the time delay to get it just the way you want it.) And if you want to shuffle your songs, check out the Smart Shuffle feature. This allows you to make shuffle more or less random.
9. Show Off Album Art With Coverflow
You saw it in the iPhone advertisements. You saw it at WWDC in the Leopard demo. We’re talking about Coverflow, of course - a feature built into iTunes. It’s one of the coolest iTunes features, and it’s a shame more people don’t use it!
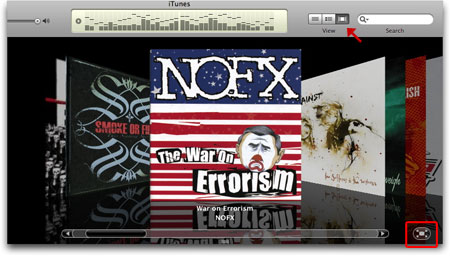
To turn Coverflow on, click the right-most button next to View. You can make Coverflow full screen by clicking the button in the lower right-hand corner. Once you’re in full-screen mode, use your Apple Remote for true Coverflow coolness!
10. Control iTunes with Quicksilver
We really like Quicksilver, the free application launcher for Macs. The good news for iTunes junkies is that Quicksilver integrates really well with our favorite music jukebox application. There are a lot of Quicksilver triggers you can assign to iTunes, which means you don’t even have to use a mouse to perform dozens of actions in iTunes!
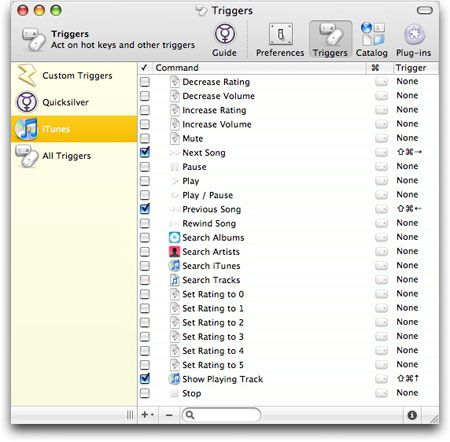
You can assign any keystrokes you like to the triggers, so have at it!
Related Articles
Subscribe to our email newsletter
Sign up and get Macinstruct's tutorials delivered to your inbox. No spam, promise!