Turn Your iPad into a Digital Picture Frame
Matt Cone June 22, 2012 Tutorials iPad Photos
You know those digital photo frames that create a slideshow of all of the photos on a memory stick? Believe it or not, you can set up your iPad to do the same thing. Using your iPad as a picture frame is a great way to enjoy your photos wherever you go. Just prop up your iPad, tap a button on the lock screen, and sit back and enjoy the pictures. We’ll show you how to do it.
Preparing the Picture Frame: Configuring Settings on the iPad
First, let’s configure the iPad’s picture frame settings. Here’s how to do it:
From the iPad’s home screen, tap Settings.
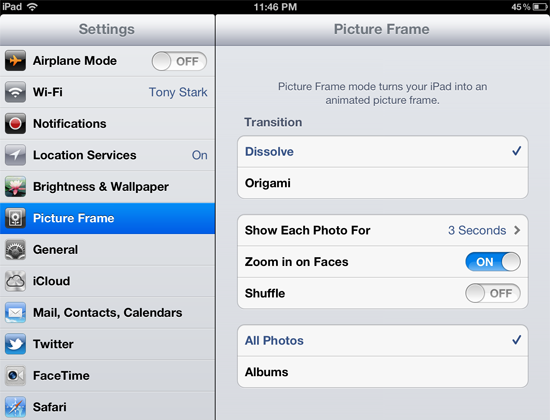
Tap Picture Frame on the sidebar. The picture frame settings appear, as shown below.

First, tap a Transition type. Dissove is a standard transition that doesn’t pull any punches. It will display the pictures on your iPad one by one, slowly fading one into the next. Origami is a little fancier. It can display 1-4 pictures on your iPad and use a variety of cool effects to transition to the next frame.
Tap Show Each Photo For to change the amount of time each photo is displayed on the iPad’s screen. This is set to 3 seconds by default, but I found that a little short. You can select 2, 3, 5, 10, or 20 seconds.
If you selected the Dissolve transition earlier, you can enable the Zoom in on Faces feature, which does exactly what you might expect. While a picture is displayed on your iPad, it will slowly move the picture to focus on an individual’s face. To turn this feature on, move the slider to the On position.
By default, the iPad will display the photos in the order you added them to your iPad. The Shuffle feature give the iPad the freedom to mix things up a bit and display photos in a random order. To turn Shuffle on, move the slider to the On position.
What photos would you like your iPad to display? You can tap All Photos to display every single photo stored on your iPad, or you can tap Albums to select your camera roll, photo stream, or a particular album. This is a great way to create a picture frame for a special occasion. For example, if you were having a graduation party, you could create an album full of photos of your child and use those for the picture frame at the party.
Okay, you’ve set up all of the settings for your iPad’s picture frame. Now it’s time to actually turn your iPad into a picture frame!
Turning Your iPad into a Digital Picture Frame
At this point, you’re mere seconds away from using your iPad as a picture frame. Here’s how to do it:
Press the button on top of the iPad’s case to put the display to sleep.
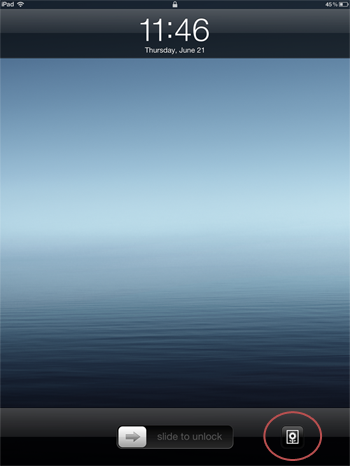
Now press the home button. The lock screen appears, as shown below.

Tap the picture frame button. The photo slideshow will appear, as shown below. (I’m using the Origami transition type.)

Now your iPad will act as a digital picture indefinitely. You can rotate your iPad to display the pictures in either landscape or portrait mode. To turn off picture frame mode, just press the home button and unlock the iPad.
Subscribe to our email newsletter
Sign up and get Macinstruct's tutorials delivered to your inbox. No spam, promise!