Using Dropbox for Version Control
Matt Cone February 8, 2013 Tutorials Mac Apps
Dropbox is a popular cloud storage service that magically moves files from one device to another, but it’s probably not the first name that comes to mind when you think of version control. However, as you’ll learn in this tutorial, Dropbox has several powerful features that allow you “undo” any changes you make to files saved in your Dropbox folder. This is an absolute necessity for those of us who use Dropbox to store critically important files that can be accidentally modified or deleted.

Why Everyone Should Use Dropbox
First, let’s talk about Dropbox and why you should use it. This should go without saying, but in a world where people spend days or even weeks working on digital projects, data loss is simply not an option. You can’t afford to lose days of work. But if you’re still saving files to your Mac’s hard drive, you’re leaving the storage of your documents to chance.
If you aren’t using Dropbox or a service like it, you should [create a free Dropbox account]http://www.dropbox.com) and start using it immediately. After you’ve installed Dropbox on your computer, you can use it to store your most important files. Dropbox will automatically store the files on your Mac’s hard drive and the Dropbox cloud servers.
It’s the ultimate backup. If Dropbox’s servers failed, you would still have the files on your Mac’s hard drive. And if your Mac is stolen or its hard drive crashes, the files will still be stored on Dropbox’s servers. For your own sake, I hope you agree that using Dropbox is a no-brainer!
What’s Version Control?
Next, let’s talk about version control. Version control tracks every change made to a document and allows you to reverse or roll back those changes. For instance, if you were editing a document and decided to delete a paragraph, you could use Dropbox’s version control features to restore that paragraph weeks or months from now.
To help you visualize how version control could work in the real world, we’ll use the example of a teenager writing an essay for his high school English class. When the student opens a new document and saves it to a Dropbox account, he creates the first version of the file. As our diligent student writes paragraphs and adds images, he saves the document periodically to protect his work. Every subsequent save creates a different version of the document in Dropbox. In fact, you could think of the different versions of the same file as different files completely. Dropbox is effectively creating a paper trail of the student’s progress.
Back to the high school student. When he walks away from the computer to make himself a snack, his sister deletes the essay, saves the file, and closes the word processing application. The essay is gone. Or is it?
Panicked, the student logs in to the Dropbox websites and discovers that he can recover a previous version of the file. Dropbox has saved the day! This is just one possible application of version control.
Enabling Dropbox’s Version Control Feature
There are two types of versioning available for your Dropbox account. The free version is automatically enabled for every Dropbox account, and it keeps track of all of the changes you make for 30 days. The Packrat version keeps track of every change you ever make to the files in your Dropbox. It requires a Dropbox Pro plan and costs $39 per year. If you’re the cautious type or just ultra paranoid, you’ll definitely want to subscribe to Packrat.
You don’t need to do anything to enable the free versioning feature. It’s enabled by default! If you’d like to subscribe to Packrat, here’s how:
Log in to the Dropbox website. (If you don’t yet have a Dropbox account, sign up for one. It’s free!)
Click your username in the top-right corner of the webpage, as shown below.
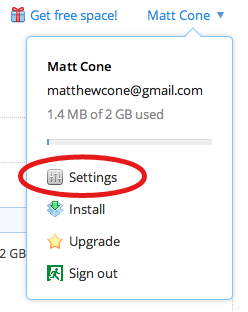
Select Settings.
If you haven’t yet upgraded to a Dropbox Pro account, you’ll need to do that now. Click Upgrade. The webpage shown below appears.
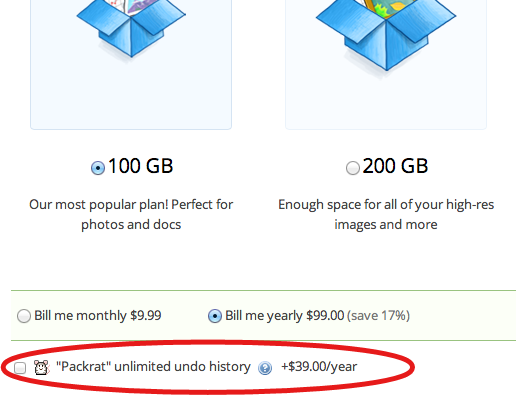
Select the “Packrat” unlimited undo history option.
Complete the checkout process to upgrade your account.
The Packrat feature is now enabled, and every file you add to your Dropbox from this point forward will be versioned forever, or as long as you continue to pay for your Dropbox Pro account and the Packrat feature.
Restoring Deleted Files
When you accidentally trash files stored on your Mac’s hard drive, those files are gone for good. (Of course, you can restore them if you have Time Machine backups, but it’s a pain.) Dropbox makes it easy to restore any file that you delete from your Dropbox folder. Here’s how to restore files that you have deleted from Dropbox:
Log in to the Dropbox website.
Click the Show deleted files button, as shown below.

All of the files and folders that have been deleted from your Dropbox are displayed, as shown below.

Optional: To download a deleted file, select the file’s link. The file will download to your computer.
To undelete a file and restore it to your Dropbox, select the file, and then click Restore, as shown below.
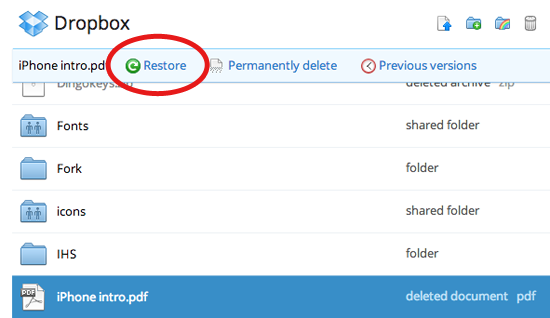
Congratulations! You have restored the deleted file to your Dropbox. Repeat the process for any other deleted files that you want to restore.
Restoring a Previous Version of a File
If you inadvertently save a file or overwrite an existing file with a new one, you can use Dropbox to recover the previous version of the file. Here’s how to do it:
Log in to the Dropbox website.
Select the file you want to restore to a previous version.
From the More menu, select Previous Versions, as shown below.
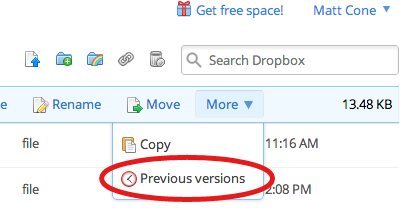
The version history for the file appears, as shown below. To download an older version of the file, select the link of an older version.
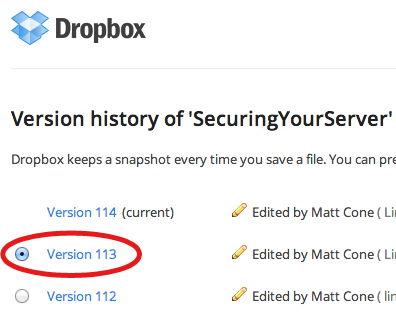
To restore an older version of a file, select the radio button next to the version, and then click Restore at the bottom of the webpage.
You have successfully restored the older version of the file to your Dropbox.
Comparing Two Versions of a File
The ability to restore a previous version of a file won’t help you much if you don’t know which version to restore. This can be a problem when you need to restore a version of a file that has been revised hundreds of times. The only way to know which version you should restore is to compare two versions of the file to see the differences.
Here’s how to compare two versions of a file in your Dropbox:
Download and install Xcode from the Mac App Store. It’s free!
Download and install the Chrome web browser if it is not already installed on your computer.
Open the Chrome application.
Install the DropboxDiff plugin for Chrome.
Log in to the Dropbox website.
Select the file you want to compare to a previous version.
From the More menu, select Previous Versions, as shown below.

The version history for the file appears. To compare the current version to an older version of the file, select the two radio buttons, as shown below.
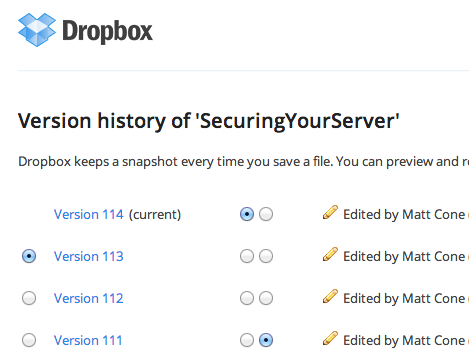
Click the Diff button at the bottom of the webpage.
The FileMerge application will open on your Mac. Use this application to compare the differences between the two versions of the file, as shown below.
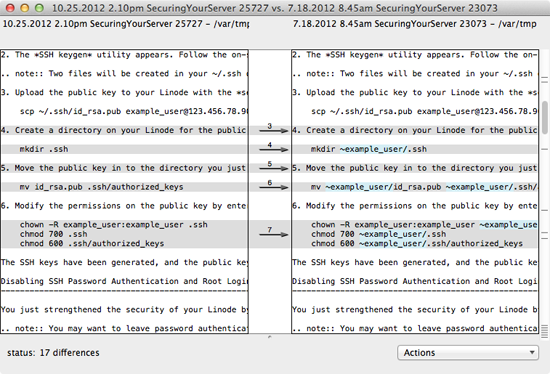
Once you determine which version of the file you want to restore, you can restore it to your Dropbox using the instructions in the previous section.
Subscribe to our email newsletter
Sign up and get Macinstruct's tutorials delivered to your inbox. No spam, promise!