How to Create a Wireless Mac File Server
Matt Cone July 17, 2007 Tutorials Mac
Everybody knows you can use Apple’s AirPort cards and base stations to wirelessly connect to the Internet. You can also use your built-in AirPort card to turn your Mac into a file server and wirelessly transfer files to your Mac from another Mac! This feature is extremely handy for those who need to transfer files from an old Mac to a new one. It’s also useful for individuals who need to transfer files in office buildings or tight living areas, such as dormitories and houses.
All you need is a Mac with a built-in AirPort card, Mac OS 10.3 or later, and a Mac-using buddy. We’ll show you how to set it all up!
Turn On Personal File Sharing
First, we’ll turn on Personal File Sharing to allow others to access our computer. We’ll set this up on the Mac that will be receiving the files and potentially acting as a file server. Here’s how to do it:
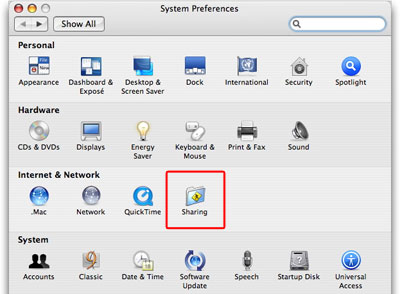
From the Apple menu, select System Preferences.
Select Sharing.
Select the Services tab. Have you named your Mac yet? No? Go ahead and type a name for your computer in the Computer Name box. Be sure to pick something memorable and descriptive - this is what others are going to see when they access your computer. If you don’t already have Personal File Sharing turned on, select it and then click Start. Your Mac might need a couple minutes to start the file sharing service.

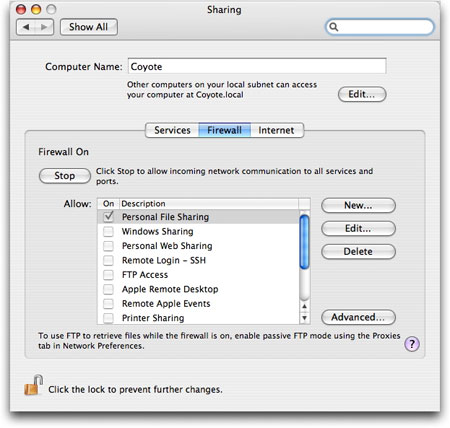
Select the Firewall tab. Make sure your Mac’s firewall is turned on and allowing network communication to the Personal File Sharing port.
Close System Preferences. That’s finished! Now we need to determine how others will be able to access our computer.
Configure Permissions
Now that we’ve set up Personal File Sharing, we can access our Mac from other Macs on the same wireless and ethernet networks. We can log in as guests and throw files in a “Drop Box,” or we can authenticate using the usernames and passwords stored on our Mac and gain total access to the file system. All of this works without any additional configuration, and if this is all you need, you can skip to the next section.
We’d like to take this file server concept to the next level. In fact, we want to allow everyone to upload and download files from our Mac. Here’s how we did it:
By default, Mac OS X directs all remote guest users to the Public folder in your Home directory. Here, your guests are able to put files into a Drop Box, which works a little like a postal mail box. You can deposit files and folders, but you cannot see the contents of the folders. This is a nice little security feature that allows friends to send you files without seeing the contents of your Mac.
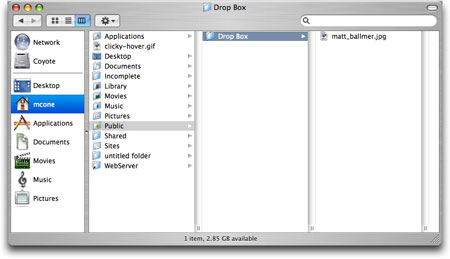
Select the Drop Box (Home Directory > Public > Drop Box), and then select Get Info from the File menu. If you’d like others to be able to see and copy the contents of your Drop Box, change the Group Access and Others permissions to something other than Write only.
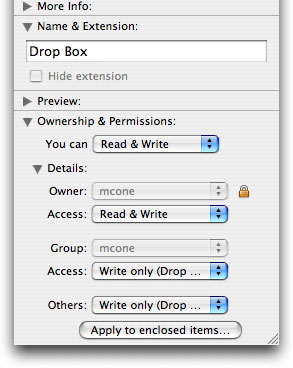
Your other option is to modify the permissions of the Public folder. (Same process as above: Select the Public folder and then Get Info from the File menu.) This is pretty risky business. If you change the permissions to Read & Write, anyone will be able to add or delete files in your Public folder. Be careful!
Accessing Your Mac From Other Macs
Now that you have your Mac set up the way you want it, it’s time to start transferring files. Here’s how to do it:
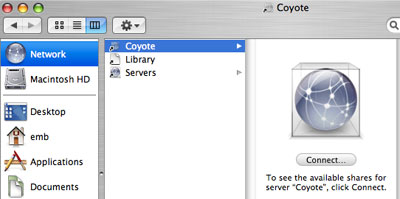
Select Network in the Finder. The Mac might take a minute or two to find the shared volume - be patient!
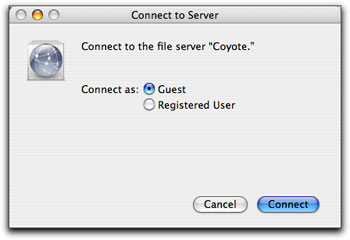
Double click on your Mac’s name and then click Connect. You’ll be asked to connect as a Guest or Registered User. Select one, and then click Connect.
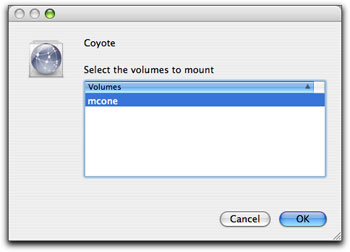
Select the volume(s) you want to mount, and then click OK.
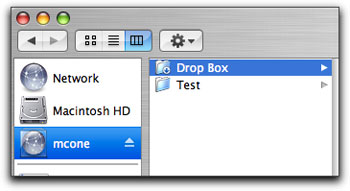
The volume will mount on the Mac. You can now transfer files from one Mac to another!
Subscribe to our email newsletter
Sign up and get Macinstruct's tutorials delivered to your inbox. No spam, promise!