How to Make Mac Icons
Wayne Linder February 26, 2007 Tutorials Mac
A few weeks ago, Matt Cone showed us how Macinstruct’s beautiful icons, courtesy of the talented Gary Gehiere, came to be. In that article, you were shown the beginning stages of icon design – how the meaning of an idea is distilled down to a few carefully placed pixels. The end result, of course, is seen here - on Macinstruct - in the icons scattered throughout the website.
But what about the development stage? Unfortunately, icons don’t just spring to life after being sketched out. There are some steps involved in getting your icons from your mind to the web page or the application. This article will be a “rubber-meets-the-road” tutorial on the steps necessary to transform your ideas into reality. This tutorial will not necessarily be the way to do it, but it is one way (my way, actually). At the end of this tutorial, you will have a beautiful* icon with a transparent background suitable for a web page or application.
Since our medium is the computer screen, we first need an application suited for painting pixels onto our digital canvas. You can find applications ranging from the free (and excellent) open-source application Gimp to the old standby Photoshop. Whichever one you use, start with a new document using the same number of pixels across as down (i.e., make it square). I usually work at the largest icon size – 128 pixels – and use 72 DPI as my resolution. Also ensure that you are working in RGB mode rather than CMYK mode as CMYK mode is for print while RGB is for screens like computer monitors.
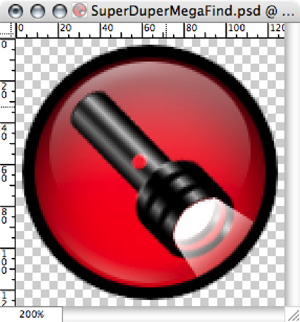
For the purposes of this tutorial, we are going to make an icon for a pretend application called SuperDuperMegaFind. As you can see in the picture below, we start with the circle typical of many application icons today. In olden times (OS 8 & 9), Apple told developers to create application icons using a diamond shape. Now, although there is a bit more flexibility in Apple’s user interface guidelines, I still find myself – along with many other developers – using round icons for every icon I create. Here’s the icon roughed out in Photoshop:
Notice that I left a bit of space for a drop shadow. You can either create one easily in Photoshop or let Pic2Icon, a utility we’ll use later, do it for you. Either way, save your finished icon as a Photoshop document and then choose Merge Visible from the layers palette. Your layers will now be combined into one image. From the Help menu in Photoshop, choose Export Transparent Image. A dialog box will appear.

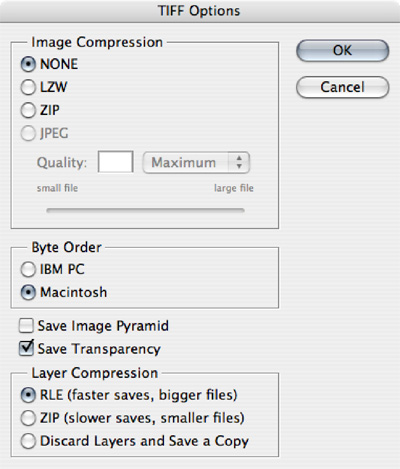
Choose the top option - “My image is on a transparent background” - and click Next. A second dialog will appear with options for print or online. I have used both and haven’t seen a difference, so I usually choose the Print option. Click Next. Since the assistant will export a TIFF document, a dialog box appears to configure TIFF settings. Here are the options I usually use:
After clicking OK, you will see the standard Open/Save dialog. Save the icon to your Desktop and you can leave Photoshop. Since we merged all of the visible layers a few steps back, Photoshop will ask you to save changes. If you choose to save the changes you will not be able to edit your document’s layers. On the Desktop, you will now see your icon. It may look strange and have a white square border around it. Not to worry. Our next step will have it looking great! Open the excellent and free application Pic2Icon. Its interface is pretty simple. Through the tabs, you can set options like drop shadows, amount of smoothing (anti-aliasing) and the like. Drag the icon into the well on the left of the Progress tab:

In a few seconds, your icon will appear on the Desktop. Here is a view of the icon in the Finder’s Get Info window:

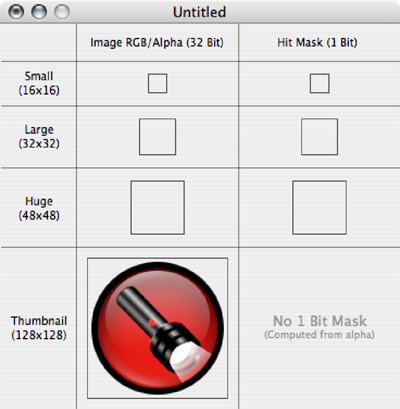
Notice how you have a nice circular icon with a transparent background. If your icon is for a website, congratulations, you’re done! If, however, your icon is for an application, then you have one more step – making the ICNS file. The ICNS file is what Apple uses to display your icon at different resolutions and also to create the masks. Masks are essentially the part of an icon you can’t see, but what the Finder uses to determine what part of an icon is clickable. To create an ICNS file, Apple has a free utility called Icon Composer. The interface is rather Spartan, but what it does, it does well. To use it, drag the .tif file created by Pic2Icon into the bottom (128x128) well:
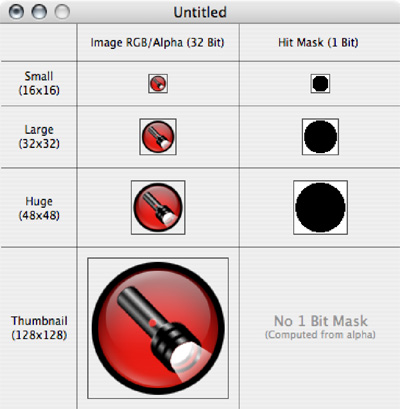
Now, drag the image from the bottom well to the next well (48x48). The application will tell you that the image you’re dragging isn’t the same size. Click the Use scaled version button. Another dialog will ask you if you want to extract a mask from the image data. You do, so click the Extract Mask button. Keep performing this process with the remaining two wells until you have an icon and a mask for the four sizes, like this:
Save it with the .icns extension and ensure the Go into application bundles checkbox is selected. Crack open a frosty beverage of your choice and celebrate your victory over pixels.
* beauty subject to both interpretation and artistic ability.
Subscribe to our email newsletter
Sign up and get Macinstruct's tutorials delivered to your inbox. No spam, promise!