Mac Backup Basics
Ric Getter March 5, 2007 Tutorials Mac Backups
It was years ago, but I still remember it. It started out as one of those odd little crashes. A completely empty dialog box appears and then everything freezes. Okay. It happens. The keyboard is frozen as well, so I reach down and cycle the power button on the CPU. The friendly thrum of the startup chime comes from the speakers and a few moments later, the flashing question mark of the mystery disk icon appears at the center of the otherwise empty screen. Another restart yields the same result. I am getting nervous now. I finally restart using my OS install CD. But when the Desktop loads (this was back in the pre OS X days) and the dreaded “This disk is unreadable…” message pops up instead of my hard drive icon, I know I’m in trouble.
Like a lot of people, I really never thought it would happen to me. I was getting paid to help other people keep their Macs running and always felt that I had a very healthy system. And yes, I did do backups. But over the course of the next twelve hours of diagnosing, salvaging and reinstalling, I realized that I didn’t do them well enough. It was the kind of lesson that I only needed to learn once.
The Data Survivalist Rule of Thumb: If it’s critically important, keep two copies in two different places.
A Matter of Priorities
The most important issue to think about is not so much what the chances are of your drive failing, but how much work you’re willing to do when it does. The trick to that is getting your recovery priorities in line.
Your top priority, of course, is preserving your original documents that don’t exist in any other form. (It would be a pain, but as long as you have a printed copy of your Great American Novel, all is not lost.) But don’t make the mistake of limiting your thinking to documents that represent your final product. You may have put a lot of work in creating document templates, macros, address lists and calendars. And don’t forget those several thousand e-mails you’ve been meaning to sort through and clean up. Have you been keeping print-outs of the important stuff (like shareware registration codes and online shopping receipts)? Also, if those browser bookmarks are really important to you, you will want to be sure that they are safe and sound somewhere.
One of the most important yet least heralded features of OS X is your Home folder. Just about everything that makes your Mac unique to you (from documents to Desktop) is located in one place. This document is home to all your program preference settings (the plist files you hear about), your web browser’s bookmarks, your e-mail collection and iTunes library. Depending on how you use your computer, the folder can get pretty big. To find out how much space you’ll need to back it up, just navigate to where it is (usually in the Users folder in Macintosh HD) and use Get Info to find out.

Surprised? Don’t forget that the two-hour iMovie epic of your six-year-old’s birthday party and the twenty gigabytes of music you ripped from your CD collection live in this folder, too. Fortunately, OS X will store your stuff in the appropriately named folders and you can use Get Info to see which ones are sucking up all that space.
The Library folder in your Home directory is one of the most important. This is where all your settings, preferences and (if you’re using Apple’s Mail, Address Book and iCal programs) your e-mail, contacts and calendar are stored. Microsoft Office stores their version of these files in the Documents folder. If you want to take a minimalist approach to backups, your Documents and Library folders are probably the two most important. These folders may fit on a fairly inexpensive USB flash drive (sometimes called a thumb- or pen-drive). Apple’s iApps make it fairly easy to burn your media collections to CD or DVD.

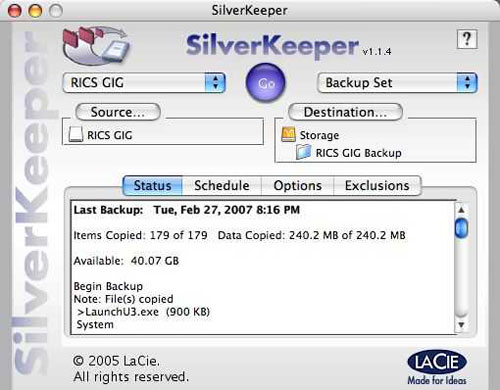
One of our favorite programs for these folder-level backups is LaCie’s free SilverKeeper. It makes it quite easy to select which files you want to back up and is smart enough to only update new or changed files on subsequent backups, saving a lot of time.
Another very convenient (albeit pricey) option is an Apple .Mac account. It offers an extremely friendly backup along with a gigabyte of storage as part of the $99/year subscription. Another $49 per year will buy you a second gig. Keep in mind that the storage is a total shared throughout your account and your web site, blogs, podcasts, family photos, etc. will eat into that. However, the current version of Apple’s Backup program will let you store your files locally on a hard drive, CD or DVD.
Also, if you’re using one of those handy little USB drives to “sneaker-net” files between work, school and home, it’s a good idea to keep a backup copy of that on your computers. (Another trick is to use what I call “cyberspace storage” for important files that only exist on my USB drive. This is simply a matter of e-mailing myself a copy of the file. Should something happen to the drive, Macinstruct readers will still get their tutorial.)
A Matter of Time
Once these files are safely tucked away somewhere off your primary hard drive, recovery then becomes an issue of relative difficulty, rather than relative disaster. In other words, how much time are you willing to spend recovering the rest of your system? Priorities come in to play here as well. Assuming you have all your original application installers and system discs, you can pretty much rebuild the rest of your system from scratch. However, if you have a large collection of applications, which, of course, will probably have a long history of updates to be installed, an external hard drive may be an economical form of insurance.
The worst-case scenario for your data is completely losing the contents of your hard drive. Even though the chances of a drive failure are fairly low (statistically, this kind of problem is most likely when the drive is either fairly new or quite old), it happens. Keep in mind that it’s also entirely possible to loose the computer that contains the drive, particularly if it’s a laptop. The cheapest way to assure a fast and relatively painless recovery from a fried drive or stolen laptop is to keep a complete and up-to-date duplicate (clone) on an external hard drive. The prices of these drives continue to fall and they’re widely available. Your safest bet is to find a FireWire drive. (Even though USB 2 is about the same speed and easier to find, some of the new Intel-based Macs may have a problem booting up from them.)
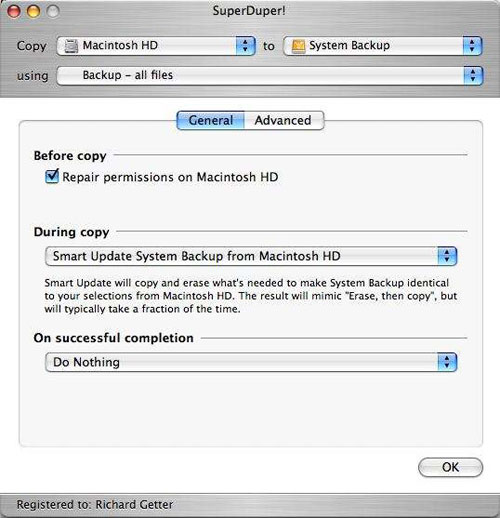
One of the best programs for the cloning approach is SuperDuper! from Shirt Pocket Software ($27.95). It will make create an identical, bootable copy of your entire hard drive and, like SilverKeeper can update the backup with only your changed files. (Silver Keeper will also create bootable clones, but I’m not quite as comfortable with its bare-bones approach to the task). Cloning will wipe out everything on the drive you’re using for a backup. However, if you’ve purchased a really huge external drive for your backups, you can use Apple’s Disk Utility to create separate partitions, using one partition for your clone and the other for anything else.
A “real” backup program like EMC’s Retrospect takes more effort to set up and has a steeper learning curve but is one of the few available options for automating small-office backups over a network. For the individual user, Retrospect made more sense back in the pre-OS X days when there was no Home folder and the files you most needed to back up were scattered all over your system. The program has the relatively unique ability to create backup “sets” from folders you select no matter where they live on your system. Now, as long as you keep your files in your Home, they’re easy for Silver Keeper to collect.
Convenience is Critical
If backups are too much trouble to keep current, they are not going to offer much security, are they? It’s quite easy to set up Silver Keeper and SuperDuper! to do single-click backups and both will let you pre-schedule unattended backups. The important thing is to put together a system that makes it incredibly easy to do backups. And then, of course, either set them up to run automatically or remember to do them manually.
I make use of both SuperDuper! and Silver Keeper as part of my current backup strategy. I use SuperDuper! to keep a clone of my entire system drive on one large partition of an external FireWire drive. I update the clone when I’m confident my system is stable and everything is working smoothly and, most certainly before I install any major OS or application updates. I backup my entire Home folder with Silver Keeper on a different partition on the same drive. I can be doing this several times per week, depending on how much work I’ve been cranking out.
In an article like this, we can only really cover the basics. There are a lot of other good tools and effective backup strategies out there. Just keep in mind that even though your data was intact today, doesn’t necessarily mean it will be there tomorrow.
Subscribe to our email newsletter
Sign up and get Macinstruct's tutorials delivered to your inbox. No spam, promise!