How to Control Cable Creep
Eric Buczynski March 23, 2007 Tutorials Mac Network
Cable creep happens slowly. You buy your Mac, you setup the keyboard and mouse, and everything is fine. But then comes the digital camera, the printer, the iPod, the camcorder, the USB hub and everything else. Before you know it, you have a tangled mess of cables on your desk. Don’t become a victim of cable creep! Organize your cables early and often.
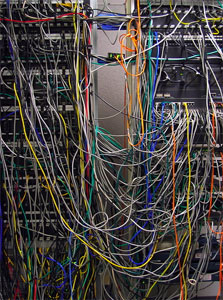
How did it get so far? And how the heck is this systems administrator going to swap out a dead switch?
Why is it important to control your cables? We can think of a thousand reasons. Do you really want to trip over your Mac’s power cable? (Okay, maybe you do if you have a new MacBook or MacBook Pro with a MagSafe connector.) We would argue that it’s best to stay organized and keep your cables out of the way, if only for the sake of cleanliness.
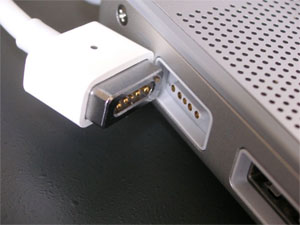
You can thank your lucky stars for this little gem. MagSafe connector = no more destroyed portables!
You can start controlling cable creep by labeling your cables – all of them. Then, if you have a lot of cables, you can group similar cables together. We’ll show you how.
Label Your Cables
Putting labels on cables makes it easy to distinguish them from one another. This might not seem like a big deal, but it comes in very handy when you have to troubleshoot devices or test jacks and ports for connectivity. You can take the easy way out and purchase fancy ready-made tags and labels, but if you’d like to save some money and have a little fun, try making them yourself. Here’s what you need:
- A few index cards or cut-up poster board pieces
- Scissors
- Pen
- Highlighter Markers (optional)
- Scotch tape or packing tape
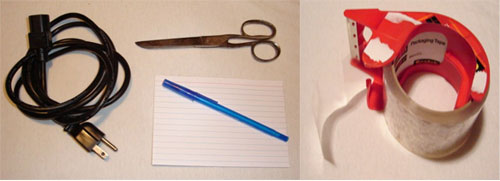
The index cards or poster board will be used for the labels, the pen will be used to write on the labels, the scissors will cut the labels and match them up with a specific size of the tape, and the tape will be used to seal the labels. The tape itself can be totally clear, or it can be of the dull or matte finish variety. If you use packing tape, it’ll allow for larger, easier-to-read labels.
You’ll want to keep track of the cords you’ll be identifying. Power cords are a good place to start, although if you tend to move your computer frequently, you may end up using a different cord. (If you move your desk further away from power outlets, you’ll need a different length power cord.) USB cables, including those used by keyboards and mice, are also good to label. When you’re moving cables in and out of a USB hub, you may not be able to keep track of which cable goes where unless they have stickers indicating which device they connect to. Marking Ethernet cables and video cables is also invaluable.
Let’s start by marking a label for the power cord for your computer. We want to label both ends of the power cord, so we’re going to need to make two labels. One label will go near the plug itself and the other end will be located near the half-way mark of the cable. There’s no need to guess where the power cord leads to when the label is right near the computer’s power jack, but having it further down, where it may get tangled with other power cords, will give you a better idea of where it’s going.
If you’re using Scotch tape, you’ll have to make labels small enough to fit within the width of the tape. When you use clear shipping tape, you have a lot more space to work with, because that tape is a lot wider.
What should you write on your labels? Obviously, you don’t want to write “power cord” – the cable thickness should designate that. Something more appropriate might be “Mac power,” “G4 power cable,” or “Charlene’s power” if you’ve given your computer a personal name. Be sure to write it on both sides of the card, and then make a second label with the same name so it can be used on the other end of the cable. Now cut out the label on the card. If you have another computer in the same workspace, you can create a similar label by giving it a different name, or using a highlighter to differentiate between the two.
Now take a strip of tape that’s double the size of the label and add an inch or so. What we’re going to do is wrap the tape around the cable, then tape each adhesive side to the printed label so that it appears on both sides.
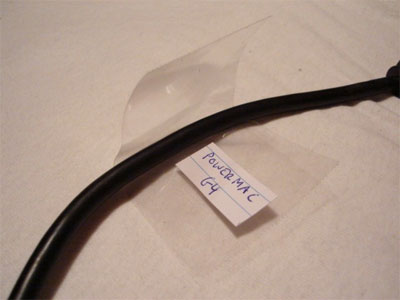
Stick the center of the tape to the cable and make sure it’s stuck to about a 180 degree surface of the cable. Stick the label to one side of the tape, move the label close to the cable without touching the cable, take the other part of the tape and apply it to the other side of the label, and then press hard on both sides.
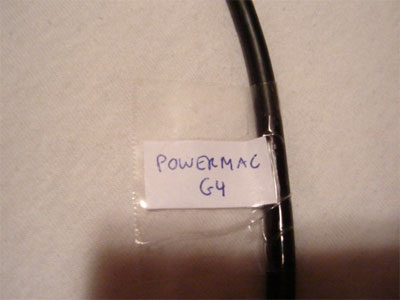
If there’s more tape on one side of the label than the other, try to wrap it around so that it sticks to the other side of the label. This way, dust won’t stick to the tape in the future. It’s not a big deal if the label’s touching the cable, but the label has more flexibility if it isn’t touching. Repeat the same process for the other side of the label.
Regarding USB cables… You may want to leave the labels open-ended. Instead of making a label that says “USB hub 1,” write “USB hub” on the top of the label and leave the bottom part blank. This way, you can write a number, letter(s), or even a color-coded shape on a small piece of tape and tape it to the bottom part of the label if that USB cable needs to be switched to another device from time to time. Whenever it needs to be switched, simply take another piece of tape with another number, letter or symbol and tape it over the original letter, number or symbol. This way, you’re only having to replace the designation on the label instead of the whole label itself. This is especially beneficial if you have a combination of USB 1.0 and 2.0 cables and need to identify those.
If you’re hosting a LAN party, labeling those Ethernet cables beforehand makes gaming set up a breeze. You can label them by computer or the participant’s name, and even include the connection speed for the computer.
Now that you’ve seen the cable labeling, the possibilities are endless. You can even label the cable jungle behind your entertainment system. If you’re not sure which cable goes into which jack, you can label the cables one at a time. If you’re a musician in a band, you can keep track of which cables belong to which person as well as where each cable goes. You can also use this in the kitchen. If you have a power strip that has no available outlets left, labeling the power cords makes unplugging appliances a whole lot easier. Now you’ll know what you’re unplugging if you temporarily have to use a blender or waffle maker.
If you’ve got a sea of wires and power cables hidden from view, consider taking the time to start from scratch. Label them for easier access – it’s a great way to spend leisure time that will pay off in the long run.
Round Up and Corral Your Cables
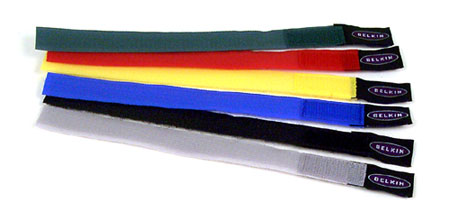
If you have a lot of cables – and we’re talking a lot – you might need to do more than just label. When it comes to network administration especially, you need to keep your dozens of cables grouped and out of sight. You can start by looking at Belkin’s velcro cable ties. You get six different colored cables for $2.99. These have many different uses – just use your imagination!
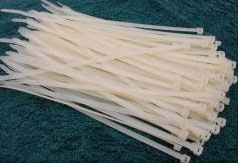
If you need something really cheap, really fast, you might consider using plastic zip ties. Just group a bunch of your cables together and zip them up! It’s a great (and cheap) way to keep your desk tidy. Look for these at any hardware store – usually you can pick up 1,000 zip ties for under $5.00.
Your cables will be under control, and your workspace will be nice and neat!
Subscribe to our email newsletter
Sign up and get Macinstruct's tutorials delivered to your inbox. No spam, promise!