Make a Movie with iMovie and a Digital Camera
Dave Strom April 25, 2007 Tutorials Mac
We’ve used iMovie for a couple of years to make movies (well, short videos). It’s a great tool: Easy to use, and inexpensive! Here, in a nutshell, is how you can do it too. We’ll show you how to do it without an expensive camcorder – from start to finish, and on the cheap. We’re slanting our tutorial to those of you who have digital cameras (use the movie mode – you won’t regret it!).
If you are looking for detailed instructions, such as how to adjust sound levels or put in transitions or special effects, you better look elsewhere. We’re going to give you the bare minimum you need to get into iMovie and make a movie, fast. So let’s go!
Get Your Equipment
- Computer Stuff: You’re going to need a Mac with a fair amount of free hard drive space. We also recommend a DVD burner. If you don’t have one, you can still create a QuickTime movie. To give you an idea of the hard drive space you’ll need, it takes 4.7 gigs free to burn a DVD, and a simple 3 minute movie project can easily take another 2 gigs (even more if you took a lot more video than 3 minutes worth). If you use a miniDV camera (see our notes at the end about camcorders), a one-hour video clip – just the clip! – comes in at over 13 gigs.
- iMovie: If you have a DVD burner, you’ll also use iDVD and Disk Utility.
- Digital Camera: It’ll need to have a decent movie mode: It’s best if you can get 640x480 and 30 frames per second. (You can get away with 15 fps, maybe even 10 fps. Use the best movie mode you have.)
- Memory Card: Hopefully you’ll have a 2 gig memory card in your camera. As for speed, we went with 50x or more, but we have seen others get away with slower cards.
Getting Started: Preliminaries and Filming
- Get Your Idea: It can be a satirical short, or even a friend’s wedding. Then either write a script, or write an outline telling you where your video clips go in your movie.
- Find Music and Sound Clips: Get the music and sound effects you want to use. Put them into iTunes for easy access.
- Create Your Video Clips: Film clips for every scene in your script, or find video clips for each topic in your outline.
- Prepare to Store: Create a folder on your Mac where you will store your iMovie project and everything associated with it. We’ll call it your iMovie folder.
- Import Video Clips Onto Your Mac: We use Image Capture for this. Create a folder inside your iMovie folder (your video clips folder) and import your video clips into it. We dislike importing videos into iPhoto; it fills up iPhoto quickly with BIG files.
Working With iMovie
Start iMovie and familiarize yourself with the application:
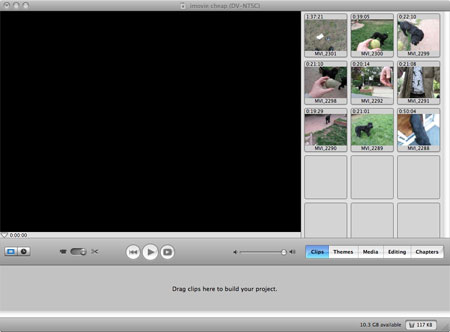
- Movie Monitor: For watching the movie. (Since no clip is selected in our screenshot, the movie monitor is black.)
- The Pane: To select your media and effects. (Our screenshot shows the Pane in clips mode, with a few video clips imported into it.)
- The Viewer: To see every video clip, photo, and sound in your movie. The Viewer can be a clip viewer for a clip-based view of your video clips and photos, or a timeline viewer for a time-based view that shows iMovie’s two audio tracks. Use the timeline/clip button
 to switch between them. The clip-based view is shown in the screenshot below. You can select one clip in the Viewer to play or edit, or several or all the clips in the Viewer to play them.
Click the clips button below the Pane, and option-drag the video clips from your video clips folder into the Pane. (When you option-drag instead of drag, you leave a backup copy of the video clip in the Pane. Refer to our notes at the end if you use a camcorder.)
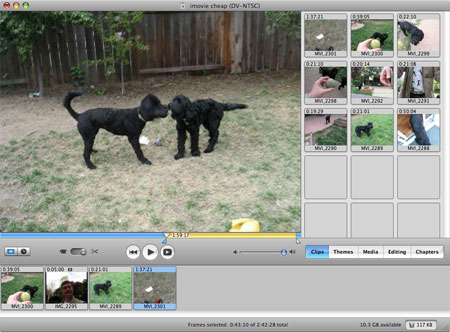
Edit your video clips. The most common edit is crop.
- Select the clip in the viewer. (We suggest that you leave the video clips in the Pane unedited, as backups.)
- Set the little arrowheads at each end in the movie monitor, and drag them to where you want your video clip to be cropped. The area in blue will be removed, the area in gold will remain.
- From the Edit menu, select Crop.
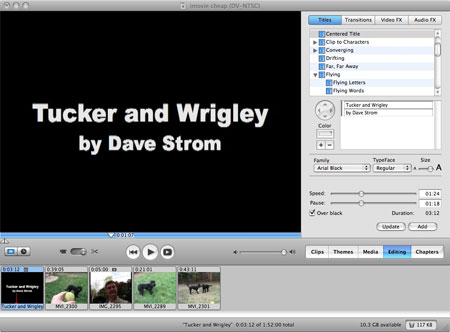
Add titles.
- Click the Editing Pane button, and then click Titles. The title list appears.
- Select the kind of title you want, such as Zoom or Centered Title.
- Type the title into the text box(es).
- Choose the duration of the title by adjusting the speed and pause sliders.
- Decide if the title will be displayed over a black background or as part of a video clip.
- If the Over black checkbox is unchecked, the title is superimposed on the video clip to the right of where you insert it into the Viewer. If you want the title to start somewhere other than the beginning of the clip, select Edit: Split Video Clip at Playhead where you want the title to start. (When you create special effects later, you can use this same trick.)
- If the Over black checkbox is checked, the title is added to your movie just like a video clip. The title appears on a black background (as in the picture).
- Drag the title from the title list (such as “Zoom” or “Centered Title”) into the Viewer.
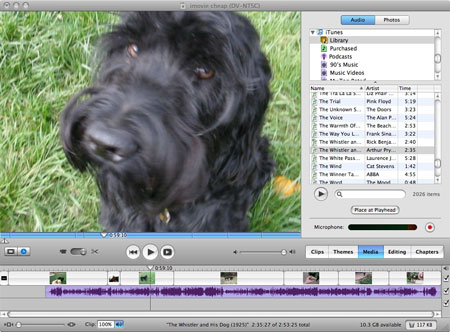
Add sounds.
- Click the timeline icon to put the Viewer into timeline mode. The audio tracks appear.
- Click the Media Pane button, and then click Audio.
- Navigate to your music and sound effects.
- Drag the sound into the Viewer audio tracks. The screenshot below shows the audio with View: Show audio waveforms selected. We find this helpful to get a visual idea of the sound.
- To crop the sound, drag either end of the sound in the Viewer audio track to shorten the sound.
Put photos into your movie, if you wish.
- Click the Media Pane button, and then click Photos.
- Drag the desired photos into the Viewer, one-by-one and in the order in which you want to see them in your video.
- The photo defaults to being visible for 5 seconds. You can experiment with the Ken Burns effect and the duration slider.

Play the movie to see if it is how you want it. Keep working on it if you don’t like it!
Save the iMovie project. (Actually, you should have been doing this all along.)
Finishing Up: Putting Your Movie on DVD
In iMovie, select Share: iDVD to send your movie to iDVD. iDVD will open. Save the iDVD project in the same folder as your iMovie project. (If you don’t have a DVD burner, select Share: QuickTime to create a QuickTime movie, and stop here.)
Edit the iDVD Project.
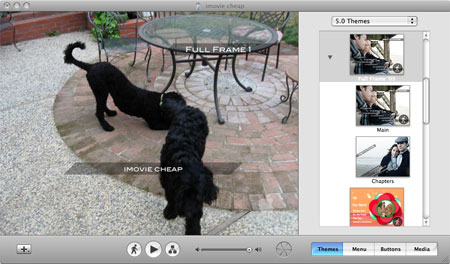
- Pick your theme. This is the introduction to your movie that appears before you play the DVD.
- In iDVD, click the Themes button. A simple one is Full Frame ‘05 in 5.0 Themes.
- Drag a photo(s) into the iDVD theme.
- Retype the text in the theme, if you’d like to.
Burn the Movie to DVD.
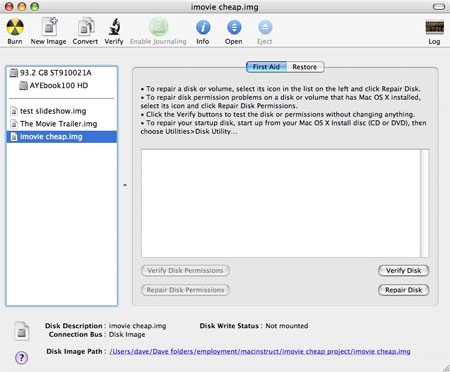
- From iDVD, burn a disk image. (From the File menu, select Save as Disc Image.). Create a disk image rather than burn directly to a DVD so that you only do the video rendering once.
- From Disk Utility, drag the disk image into its Pane, select the image, and then click the burn icon. (In order to burn a disk image or a DVD (single-layer), you must have at least 4.7 gigs free on your system hard drive. And you better have more than that.)
Important Notes
If you used a camcorder instead of a digital camera, import your video clips by connecting your camcorder to your Mac (Firewire or USB 2.0) and switching the iMovie import/edit switch  to import. The clips will appear in the Clips Pane. Be sure you use Option-drag to put these clips into the Viewer and that you edit the clips in the viewer. This will leave the original clips in the Pane as a backup.
Why keep a backup? Because iMovie is a destructive editor. When you edit a video clip in iMovie, you change the clip. For example, adding a title to a clip means that the video clip now has the title embedded in it. (This is different from Final Cut, where your video clips can be edited without changing the clip.) Make sure you always have a backup copy of your original video clips. (Okay, iMovie 06 has more undo capability, but backups are still a good idea.)
If you ever move your iDVD project and open it, you might have to re-link your videos and external photos to the iDVD project. That is one reason we were telling you to store your project information in places where you can easily find them. And you will move it eventually – video projects take lots of space, and you will archive it some day.
Subscribe to our email newsletter
Sign up and get Macinstruct's tutorials delivered to your inbox. No spam, promise!