How to Connect a Hard Drive to the AirPort Extreme
Matt Cone December 28, 2011 Tutorials AirPort Network
You can use an AirPort Extreme Base Station to create a wireless network for the computers and devices in your home or office. But did you know that you can also connect a USB hard drive to an AirPort Extreme? Doing so effectively creates a network drive that can be accessed by all of the users connected to the wireless network. It’s a great way to share documents, photos, music, and movies with the other people on your network.
Connecting the Hard Drive to the AirPort Extreme
The first step is to actually connect the USB hard drive to your AirPort Extreme Base Station and let the AirPort know that the drive is plugged in. In the following sections, you’ll try accessing the network drive on your Mac and configuring the drive’s security settings.
Here’s how to connect a hard drive to the AirPort Extreme:
Make sure the AirPort Extreme is turned on and correctly configured. (To set up an AirPort Extreme for the first time, see How to Set Up the AirPort Extreme.)
Connect the USB hard drive to the AirPort Extreme. You can use any old USB hard drive - even a USB thumb drive.
Open the AirPort Utility application. (It’s in Applications → Utilities.) The window shown below appears.
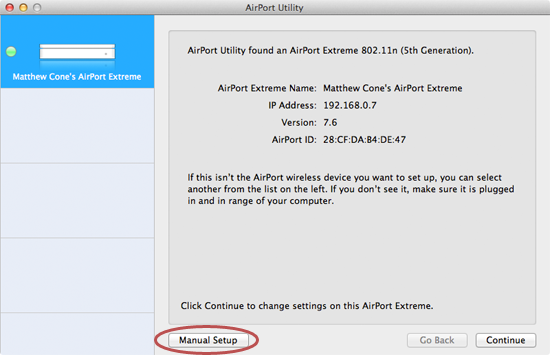
Click Manual Setup.
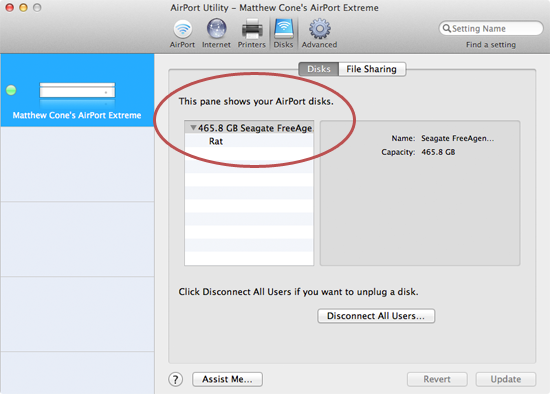
Click Disks. The window shown below appears. Verify that the hard drive you connected to the AirPort Extreme is shown in the pane.
Click File Sharing. The window shown below appears.
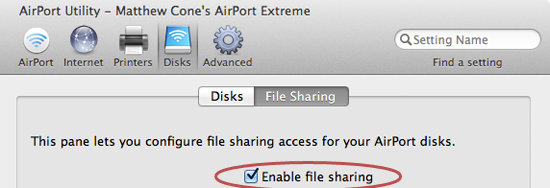
Select the Enable file sharing checkbox.
That’s it - you’re now sharing the USB hard drive on your wireless network!
Accessing the Network Drive on Your Mac
Now that you’ve got the hard part out of the way, you can use your Mac to connect to the network drive. The Finder views your AirPort Extreme as a server, so the network drive looks a little different than other mounted hard disks, but don’t worry - you can use the network drive the same way you use any other hard disk.
Here’s how to access the network drive on your Mac:
Switch to the Finder.
From the Finder menu, select Preferences. The Finder Preferences window shown below appears.
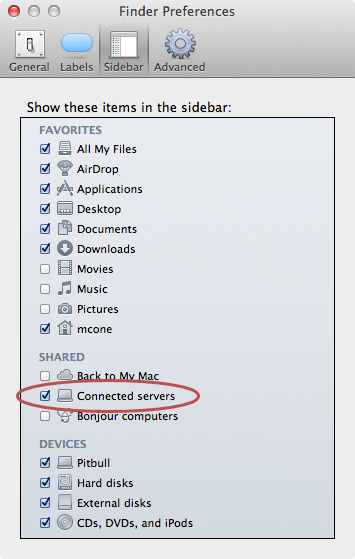
Select the Connected servers checkbox, if it is not already selected.
Close the Finder Preferences window.
Open a new Finder window. (You can do this by selecting New Finder Window from the File menu.) The window shown below appears.
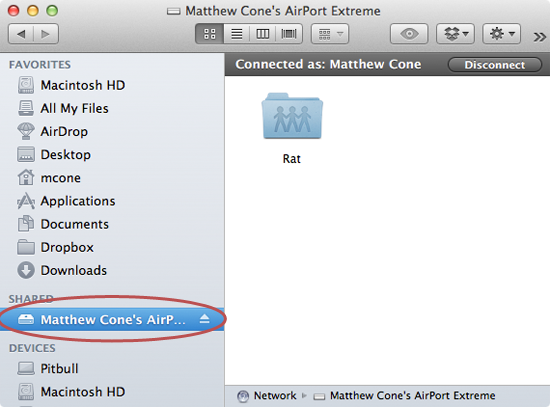
From the sidebar of the Finder window, select the AirPort Extreme Base Station. The hard drive appears as a folder in the Finder window.
Now you can drag and drop files to the network drive, just as you would to any other hard disk mounted on your Mac. The only thing left to do is select a security setting for your network drive.
Securing Your Network Drive
The AirPort Extreme Base Station allows you to select one of three options to secure your network drive:
With accounts: This is a good option for networks that have lots of users who require different types of access. Every individual will have their own username and password. You can allow users to have “read only” or “read and write” access permissions to the network drive. Could be useful in a situation where an employee needs the ability to view files on the network drive, but should not be creating or modifying files.
With a disk password: This option probably strikes the best balance between security and convenience. All users will share one password to access the network drive.
With AirPort Extreme password: To access the network drive, all users will enter the password you set for the AirPort Extreme Base Station. (That password is stored in AirPort Utility Application → AirPort → Base Station.) This option is not recommended for networks with multiple users, because anyone with the password could change your AirPort Extreme’s configuration.
Here’s how to secure your AirPort’s network drive:
Open the AirPort Utility application.
Click Manual Setup.
Click Disks.
Click File Sharing. The window shown below appears.
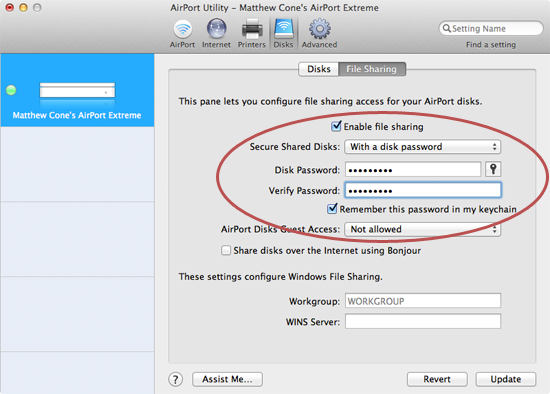
From the Secure Shared Disks menu, select a security option.
If you selected With accounts, click Configure Accounts and then add an account for every user who will be accessing the network drive.
If you selected With a disk password, enter a password for the network drive in the Disk Password and Verify Password fields.
Click Update. The AirPort Extreme restarts and applies the security setting you selected.
You’re finished! Now anyone with the password (or an account) can access the network drive. It’s a good idea to save the password to keychain so you don’t have to enter it every time you connect to the drive.
Related Articles
Subscribe to our email newsletter
Sign up and get Macinstruct's tutorials delivered to your inbox. No spam, promise!