How to Customize Your Desktop and Screen Saver
Matt Cone April 10, 2007 Tutorials Mac
Putting a picture on your desktop and adding your own screen saver is one of the easiest ways to customize your Mac. There are loads of free desktop pictures and screen savers available on the Internet – just search for them! In fact, Apple has a website chock full of free screen savers.
You have a couple different display options when it comes to desktop pictures and screen savers. You can add just one picture that will be displayed on your desktop all the time, or you can choose to shuffle through your desktop pictures to make a custom slide show for your desktop. Screen savers are also cool even though they aren’t necessary anymore. LCD displays don’t need screen savers, because the images don’t “burn in” to screens like they did on older CRT displays.
We’ll show you how to use custom desktop pictures and screen savers!
Set Your Desktop Picture
Choose your image. The larger the image, the better the quality. Keep in mind that you will be blowing the image up considerably. Our LCD screen is one of the smaller ones – 15” diagonal. One of those Apple Cinema Displays will need a proportionately larger image to look good. On our computer, a 56Kb image is about the smallest we can use before it starts to look pixelish. The image should also be a rectangle in approximately the same aspect ratio as your screen. Your Mac can be told to fill the screen, which will stretch or compress the image, so if your image’s aspect ratio is a square, for example, the image will be squashed looking. Be careful! That picture of Jupiter could come out egg-shaped.
Locate the image and place the it in its own folder.
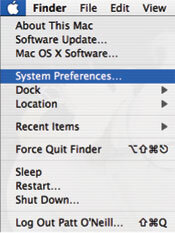
From the Apple menu, select System Preferences.
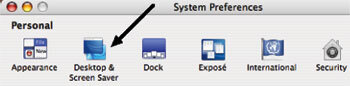
In System Preferences, click on Desktop & Screen Saver.
Select the Desktop tab. See that menu to your left? Your single image is in a folder, so click Choose Folder and go find and select it. It will appear in the window to the right of this menu, where you see the little colored rectangles in the image below.
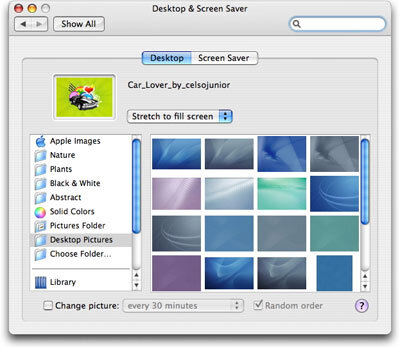
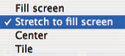
Now that you have selected your image, you must decide how you want it to appear. There is a menu just below the Desktop Screen Saver tabs that will tell your computer how to deal with the image. We recommend that you select the Stretch to Fill Screen option.


At this point, your image should be on your desktop!
Set Your Screen Saver
In the System Preferences (Desktop & Screen Saver window), click the Screen Saver tab. Click Choose Folder in the left-hand side-bar to select your screen saver.
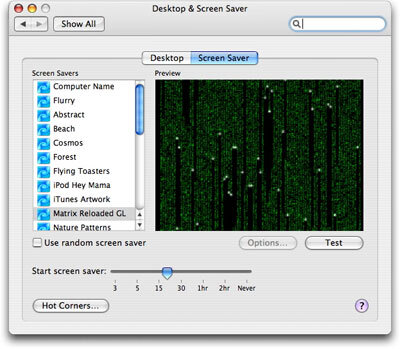
You can tell your Mac how long it must remain idle before the screen saver starts. You can also program a hot corner by clicking the Hot Corners button in the lower left-hand corner of the window.


A hot corner is one which you have preprogrammed. In this case, the upper right-hand corner of the screen has been made the hot corner to turn the screen saver on whenever you put your cursor in the upper right corner. Note: The Use random screen saver selection option should be left un- checked. More on this confusing option later. And ignore the Options button, because it pertains to slideshows, which we will also go cover later.
Make a Desktop Slideshow
The slide show consists of your single desktop image and lots more images. You can make different files and sort images according to subject matter. We have an animals and nature file, a file of space shots from the Hubble and Spitzer telescopes, a file of sacred sites, and others. We change them whenever I am in the mood. You can add and delete images. This is really a flexible feature. It is amazing how many people leave that boring blue swirl on their desktop when it is a piece of cake to customize!
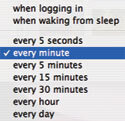
Once you have your image file, go back to Desktop window in System Preferences above and select the folder of images you want. Now decide how often you want to have the slideshow change the picture. Then decide if you want the computer to display the images in the listed order or randomly. It’s sooooo easy.
The Random order option to the right of the picture change menu will tell your Mac to randomize the images within your selected folder.

Make a Screen Saver Slideshow
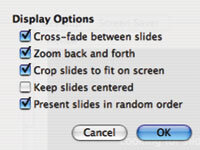
A screen saver slide show is better than the desktop slide show in that you don’t have the icon clutter from your desktop over the wallpaper. In the Screen Saver window of System Preferences, select Choose folder and select a folder full of pictures. The Options button will allow you to decide how you want your Mac to control the show.
We haven’t been able to find an option to control the speed at which a new slide comes up, but the default rate is comfortable.
The Use random screen saver option will rotate randomly among all the listed screen savers in the menu seen in that window, including the ones that shipped with your Mac. It does not tell your Mac to randomize the selected pictures in your folder, unlike the desktop slideshow.
