Turn Your Mac into a Wireless Captive Portal Server
David Miller July 25, 2007 Tutorials Mac Network
What does a captive portal server, also called a NAC (Network Access Control) do? It can sandbox any wireless connection until some form of authentication is provided. These servers are used in many cafes and public places that offer wireless internet. For example, when you try to connect to the wireless network at Starbucks, it will force your web browser to the same page - no matter what URL you enter. Until you authenticate, you can’t go anywhere on the internet.
There are some great commercial solutions out there that work really well, but implementing 802.1X port security can cost lots of money and time. Companies like Infoblox provide an appliance, and when coupled with solutions like Bigfix can provide a very robust and transparent network security model. Pitney Bowes has implemented a system were an unknown user can attach their laptop and get one of two services: Either simple port 80 access for 8 hours, or the option to register and automatically have their computer scanned patched/updated to comply with the companies policies. This is all transparent.
So what do you do if you don’t have the resources or the money to buy one of these solutions? You can still implement some control over DHCP assignment. The goal is to eliminate the unknown on your network. In our case, we will use the Ethernet MAC address of the client’s NIC as a way of authentication. Each network interface card has its own unique address, and it looks something like this: 00:30:65:88:01:93. When an unknown computer is placed on the network that asks for an IP through DHCP it will receive one that is restricted. No matter what web page the user tries, we will always show them a pre-defined page. When a computer that has its MAC address defined on the server asks for an IP, it will be given the correct TCP/IP settings to use the network.
Here’s how to do it:
Make sure the Mac you are using has all os updates and security patches applied.
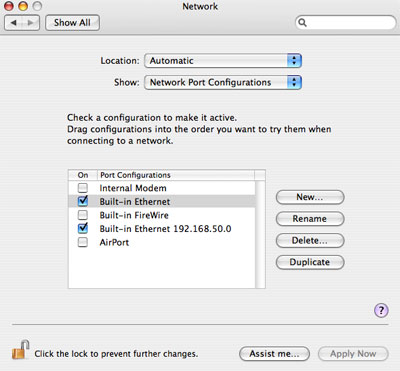
From the Apple menu, select System Preferences. Select Network. Turn off all unused configurations. The interface we will be using is the Built-in Ethernet.

Select Built-in Ethernet and click Duplicate. Click Rename and add your dummy subnet.
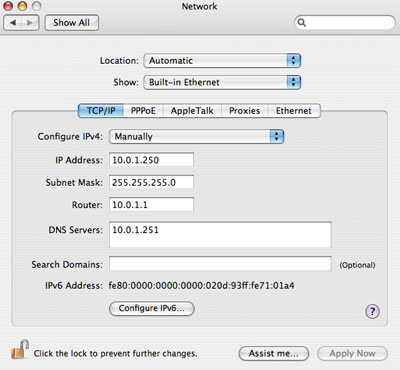
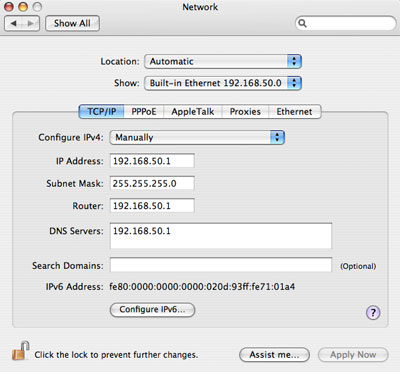
Edit the interfaces to have the correct subnets.


Make sure you are logged in as an admin to use the sudo command. You will need to use a text editor like VI, Pico, Emacs, or TextWrangler to create and edit the config files needed. Download the latest version of DHCP from http://www.isc.org/index.pl?/sw/dhcp/. The latest version at the time of this article is 3.0.6. You will need to have the GCC compiler installed. Install the Xcode developer software that came with your Mac or latest Mac OS X install disks.
Once you have downloaded the DHCP source, double-click on the .gz file to unzip and untar the directory. Launch the Terminal application (located in /Applications/Utilities). Use the “cd” command to change to the dhcp directory you just expanded. The easiest way is to type “cd” and drag and drop the dhcp directory into the Terminal window. Here’s an example:
cd /Users/dmc/Desktop/Downloads/dhcp-3.0.6/Now type the following and hit return.
./configureType the following and hit return.
makeType the following and hit return.
sudo make install
Setting Up DHCP
You now should have a working DHCPd package installed on the Mac. The next step is to set up the dhcpd.conf file that lives in /etc. The below example will do just that. Here’s how the thing works:
- Hand out static IPs in the 10.0.1.0 range to hosts that we have the Ethernet hardware address of (MAC address).
- Hand out dummy IPs in the 192.168.50.0 range that will force all host names to resolve back to our captive portal server. This will force any http requests to show the page we want people to see.
You should read the man page for dhcpd.conf to gain an understanding of the options and commands used here.
======================begin dhcpd.conf===========================
# dhcpd.conf
# this file should be located in /etc
default-lease-time 900;
ddns-update-style none;
deny client-updates;

shared-network "mynet" {
   # This is the dummy network
   subnet 192.168.50.0 netmask 255.255.255.0 {
      range 192.168.50.2 192.168.50.253;
      max-lease-time 7200;
      option subnet-mask 255.255.255.0;
      option broadcast-address 192.168.50.255;
      option domain-name-servers 192.168.50.1;
      option routers 192.168.50.1;
   }

   # This is the real network subnet
   10.0.1.0 netmask 255.255.255.0 {
      max-lease-time 21600;
      option subnet-mask 255.255.255.0;
      option broadcast-address 10.0.1.255;
      option routers 10.0.1.1;
      option domain-name-servers 10.0.1.251;
      option domain-name "example.com";
   }

   # This is a sample reserved host entry
   host example1 {
      hardware ethernet 00:30:65:88:01:93;
      fixed-address 10.0.1.5;
   }

   host example2 {
      hardware ethernet 00:16:cb:91:16:93;
      fixed-address 10.0.1.6;
   }
}
======================end dhcpd.conf===========================
Create the dhcpd.leases file using the following command:
sudo touch /var/db/dhcpd.leasesTo test the the DHCP server, run the following command in a Terminal window:
sudo /usr/sbin/dhcpd -f -d en0The command runs DHCPd in the foreground using the-foption and in debug mode using the-doption. This allows you to see all actions the DHCP server is performing. Populate the dhcpd.conf with the MAC addresses of the hosts you want.Alternatively, you can also assign random IPs from the real network if you don’t care who gets what IP. To do this, leave out the the “fixed-address” line of the reserved host. in the real network section add a line to deny unknown clients and add a range of addresses to hand out like so:
}
# This is the real network
subnet 10.0.1.0 netmask 255.255.255.0 {
   max-lease-time 21600;
   range 10.0.1.2 10.0.1.250 deny unknown-clients;
   option subnet-mask 255.255.255.0;
   option broadcast-address 10.0.1.255;
   option routers 10.0.1.1;
   option domain-name-servers 10.0.1.251;
   option domain-name "example.com";
}
Set Up the Dummy DNS Server
First create a file in /etc called rndc.key. This file will keep BIND from complaining that it is missing. Since you will not be updating, the DNS we can use a generic file and not include anything in the named.conf.
======================begin rndc.key===========================
key "rndc-key" {
   algorithm hmac-md5;
   secret "8E48raKxqEVCtKYFxA+loQ==";
   };
======================end rndc.key===========================
You will need to create the following named.conf file in /etc:
======================begin named.conf===========================
acl dummynets { 192.168.50.0/24; 192.168.51.0/24; };

options {
   directory "/var/named";
   auth-nxdomain no; # conform to RFC1035
   notify no;
   allow-query { dummynets; };
   allow-recursion { none; };
   allow-transfer { none; };
   max-ncache-ttl 60;
};

logging {
   category default { _default_log; };
   channel _default_log { file "/Library/Logs/named.log"; severity info; print-time yes; };
};

zone "." IN {
   type master; file "db.fakeroot";
   allow-query { dummynets; };
};
======================end named.conf===========================
The above says to use
db.fakerootas the root dns zone file. Theacl dummynets { 192.168.50.0/24; 192.168.51.0/24; };says that only our dummy subnet can request queries.Now we need to create the db.fakeroot zone file in
/var/named.======================begin db.fakeroot=========================== $TTL 7200 @ IN SOA hostname.exapmle.com user.example.com ( 1 ; Serial 3600 ; Refresh every 1 hours 1800 ; Retry every 30 minutes 604800 ; Expire after 7 days 1 ) ; TTL 1 second IN NS 192.168.50.1 IN A 192.168.50.1 * IN A 192.168.50.1 ======================end db.fakeroot===========================The above zone file resolves all hostnames back to 192.168.50.1.
Apple has included a launch daemon plist that can be used to start and stop the named service. Unfortunately, it doesn’t work, because it launches named before all the network stuff is loaded at boot. Until we get a fix, use the old style startup item.
Test the DNS service by typing the following command on a host computer that has been given one of the dummy IPs:
host www.cnn.comIt should resolve to 192.168.50.1.
Set Up Apache to Redirect Missing Paths
The line you want to edit in your httpd.conf file looks like the following:
#ErrorDocument 404 /missing.html
Change it to: ErrorDocument 404 /
Create a simple index.html page that tells the user to contact you for proper access and save it to /Library/webserver/Documents. Turn on personal web sharing in the sharing system preferences pane to start Apache.
You can get pretty creative using CGI and have users fill out a form that gives you their information.
Subscribe to our email newsletter
Sign up and get Macinstruct's tutorials delivered to your inbox. No spam, promise!