Use iPhoto to Make So-So Pictures Super Cool
Matt Cone June 12, 2007 Tutorials Mac Photos
If you listen to the digital photography experts, even the well-meaning experts, you might walk away thinking that unless you use expensive software like Aperture or Photoshop, you cannot possibly make art or even a decent image with cheap applications like iPhoto. We’ve never listened to the so-called “experts” much, so believe us when we say that ignoring the “experts” can give you an edge in creating really beautiful art!
In this article, we’re going to use a basic snapshot that has very few redeeming qualities. Few people would consider this photo “art.” We’ll take this image and try to make some art using nothing more than iPhoto and a basic understanding of how to use the iPhoto application.
The image is just a basic snapshot of a child’s sandbox with some toys scattered around. It has good contrast and strong elements, which will help in the overall picture.

To be very honest, we did take several pictures of this scene. We worked with the shadows and the toys in the picture, but at the time, none of the photos really turned out the way we had hoped.
Some General Photo Advice
We take many pictures just to play around and to see what we might catch. We try different angles, depths of field, shutter speeds and exposures. In these images, nothing really caught our attention. But then we came back to the images a few weeks later and thought we might be able to do something with them as a “memory” image.
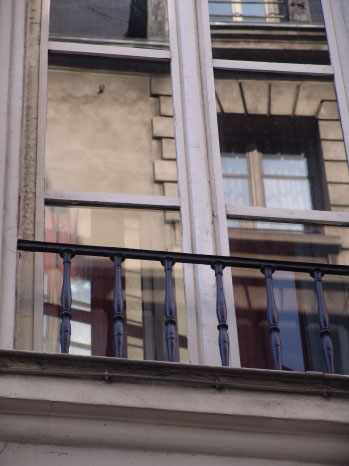
We rarely delete any image, which is why we have over 13,000 images archived. The reason for this no delete policy is that after a period of time, what seemed to be a hopeless image might be used in something else, or be used as a basis of a new image. One case in point is an image that we shot from a moving bus in Paris, through the glass window of a window with the reflections of other windows in it. While the composition was cool, the image was too blurred to be of any real use, since it was literally a snap and shoot. You can see the basic image below.
This image sat in our archive for almost a year, and every now and then we would go back to it and sigh regretfully, because we really liked the idea of the windows in a window. As it happened late one night, we were killing time and came across this image again. This time, we loaded it into Photoshop and started playing with it. We ended up turning the image into a “watercolor” image, which took advantage of the already present blurriness of the image. We used several different filters to get the effects we wanted and by 3 AM, we had our keeper image, which many people have enjoyed! Most are surprised when they hear the history of the image. You can see the results below.
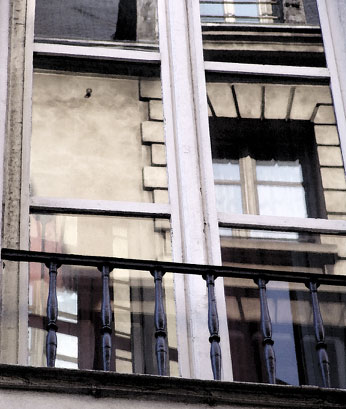
Why didn’t we use this Paris picture for this article? Because we used Photoshop for the layers capability and some filters that iPhoto doesn’t offer. We use the tools we need, and in this case, Photoshop was the tool we had that could do the job we wanted.
When we did the same type of creation using iPhoto, we knew that many people would not realize that iPhoto makes really good art. So the lesson to take away from this is to never delete your images unless they are really bad images.
Use iPhoto to Tweak Your So-So Picture
Back to the first image - the one with the sandbox. It has decent exposure and sharpness, and that’s about it. But, we did eventually think of a type of image that this photo might work for, and that was a memory picture. A memory picture is the type of picture that is intended to evoke memories of someone - a thing or an event in the past. They tend to look old, because we use techniques like sepia toning or black and white conversion, as well as other stuff. For this image, we wanted to evoke feelings of childhoods past, but with present-day toys. So we knew we needed to adjust the colors and find a way to bring the focus of interest (which is the toys) to the center of the image.
Before you change anything, back up the image! Many times, your image application will not change the original file, but you really do not want to trust that, so always make a backup of any image you are about to manipulate.
The first step is to clean up the image by cropping it. To clean up the edges and make sure the picture is oriented correctly, use the straighten tool from the iPhoto Adjust palette. To get there, just double-click on the image and click Adjust.
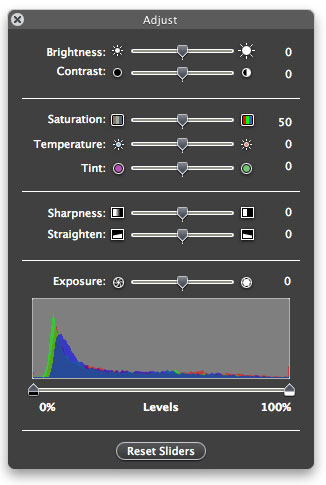
Depending on the image, we’ll take time to sharpen the image a little, normally around 20 percent, but it really depends on what we plan to do with the image. In a normal situation, sharpening is the past thing to do just before you print the image. But we’re not dealing with “normal” right now, so there are no hard and fast rules. In this example, since we want a dreamy or memory image, we will be softening the image later, so sharpening it right now really does not do much for the end result.
Now that we have our basic image cropped and straightened up, we can move on to adjusting the colors in the image. Remember that the style of image we want in the end will not have vibrant or new looking colors - we want them to be somewhat faded out. So let us introduce you to a second adjustment palette in iPhoto called “Effects”. Our next few adjustments will come from this tool. Just double-click a photo in iPhoto, and then click Effects.
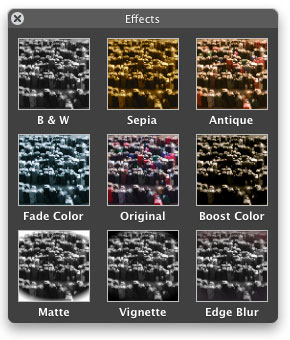
We have quite a few choices, and we have to remember that the changes are cumulative, so when you select an effect, it will stay in place if you add a second effect, or it will increase in intensity if you choose the same effect a second time. It is this additive effect that we will be using to our advantage to age our print. Our first effect is to “Boost Color”. This adds to the primary color saturation and gives us a good color base to use for our next effect which is “Antique.” We used this effect once to reduce the overall colors, but since we boosted the primary colors, they stay a bit brighter than the rest. It also warms the overall image with a bit of a yellow cast.
Now we want to reduce the colors a bit more since the image is still too bright for what we had in mind. To do this, we use the “Fade Color” effect, which reduces both the yellow cast plus the colors. Our primary colors stay a bit brighter, but now they look like an old image since in a real picture, not all colors fade evenly.
Our final two choices of effects from this palette are the “Vignette” and the “Edge Blur” effects. We first apply Vignette to darken the corners, which makes the eye want to move to the center of the image. Then we use the Edge Blur to blur out the Vignette for a smoother transition. At this point, the image is almost finished. You can see how we are very quickly moving from an uninteresting snapshot to an image that qualifies as “art.”
Now we have two final adjustments to make, and both are back in the Adjustment Palette. We use the sharpness adjustment to blur just a bit of the overall image to get that dreamy look, and then we use the temperature adjustment to warm up the entire image a bit. Virtually all of these adjustments depend heavily on your own personal tastes, which is why we’re refraining from providing a percentage for each adjustment.
Below, you see the final image which we feel is now very presentable and would look nice printed and framed on anyone’s wall!
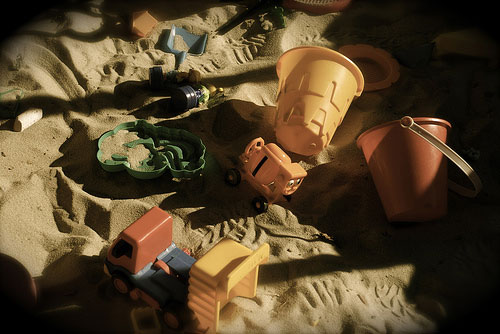
As you can see, we did not use any expensive software or fancy tools to perform these manipulations. We just used the features available in iPhoto!
Anyone can do this type of manipulation with a bit of thought and a strong dose of experimentation. And once you have created your masterpiece, you will want to share it with friends and family, so we highly recommend the use of a photo sharing site like Flickr or Fototime. We personally like Flickr since it is more a community than a photo site, but that’s entirely up to you.
Now go have fun with iPhoto, and never again feel embarrassed that you are not using the fancy software!
Subscribe to our email newsletter
Sign up and get Macinstruct's tutorials delivered to your inbox. No spam, promise!